Overview
- Getting Started Logging In
- LANforge Manager
- Netsmith: Virtual Network Configurator
- Client Administration and Client Login
- Test Managers
- Layer-3 Cross-Connects (FIRE)
- Layer-3 Endpoints (FIRE)
- VoIP Call Generator (SIP, RTP, RTCP)
- VoIP Endpoints
- Armageddon (Accelerated UDP)
- WanLinks (ICE)
- Collision Domains (ICE)
- File Endpoints
- Layer 4-7 Endpoints (FTP, HTTP, etc.)
- Generic (User) Endpoints (ping, traceroute, etc.)
- Resources (Data Generator Machines)
- Serial Spans (PPP/T1, PPP/E1)
- Creating & Modifying PPP Interfaces (Serial, PPPoE)
- Ports (Interfaces)
- Event Log
- Command Output
- Table Calculations
- Pull-Down Options
Overview
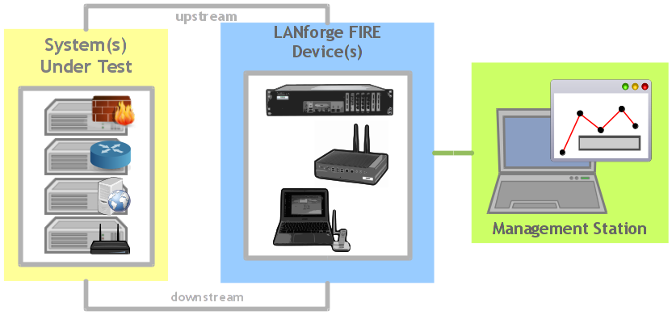
The LANforge-GUI is a graphical management interface to the LANforge system. The GUI connects to the LANforge manager process, which automatically discovers the LANforge Data Generators (also called 'Resources') on its management network. Because the connection to the server is a standard TCP/IP interface, the GUI can access the server remotely, even over a low bandwidth connection. The GUI has extensive 'tooltip' support, so if you are unsure of what a particular field or option box does, momentarily position the mouse cursor over the field of interest and view the brief description.
Clicking the HELP button will pop up a new window using your default browser displaying the section of the LANforge-GUI User Guide relating to the selected tab on the GUI display.
NOTE (Windows Vista users): Clicking HELP will direct your default browser to the Table of Contents of the LANforge-GUI User Guide and not to the specific section. From the Table of Contents, you can click on the section desired.
For a some ideas on how to test specific architectures and protocols, see the cookbooks: LANforge-GUI FIRE Cookbook and LANforge-GUI ICE Cookbook.
Getting Started & Logging In
After installing the LANforge-GUI, you are ready to begin. First, start up the LANforge-GUI by double-clicking the anvil icon on the desktop. After clicking OK on the End User Licence Agreements, three windows should pop up, one of which is a login window that looks something like this:
NOTE (Windows Vista users): LANforge-GUI must be run as administrator from the desktop shortcut or Start menu.
Enter the name or IP address of the LANforge server that you wish to connect to. If you are running the GUI on the same machine as the LANforge server, then you can enter 'localhost' here. Note that the default server port is 4002, but this could be different depending on how the LANforge server was installed. You can also click the Discover button to have the GUI discover other LANforge systems on the local subnet. NOTE: The discovery process may be inhibited if the machine running the GUI has a firewall enabled.
Newly discovered systems are added to the drop-down menu and can then be selected. After entering the correct information or selecting the server from the drop-down menu, click the Connect button, and the GUI will attempt to connect to the server. If the server is re-started, or if the connection from the GUI to the server is lost for any other reason, the GUI will attempt to reconnect to the server every 5 seconds.
The last 20 servers that you logged into will be added to the drop-down menu for ease of use when re-connecting. If you ever want to re-initialize the list, remove the lfcnf.txt file that is in the LANforge-GUI installation directory and re-start the GUI. A new file will be created the next time you connect to the server.
-
LANforge Manager
After you have connected to the server, the splash screen will disappear and the LANforge Manager window will appear with the Status tab displayed:
The Status Tab contains the following management panels:
- The License Info panel displays LANforge license information and lists days remaining on the license and software support. The background of each counter will turn yellow when the licenses are within 1 month of expiration, and red when within 1 week of expiration.
- The Current Users panel lists users that are logged into the LANforge Server. Because the LANforge system can be accessed by multiple users simultaneously, this panel will help you coordinate and understand the current usage of the LANforge system. Some of the 'users' are other LANforge processes.
- The Test Configuration Database panel displays the current list of configuration databases that may be found on the LANforge Server. Use this panel to load, save, and delete test databases. When loading, you are given the option of overwriting the current configuration with the database you are loading, or you can just append the new database to the existing configuration. Note that if you append databases that conflict, (for example, they each have a cross-connect named "cx1"), then the last one wins, and it may look a little messy. The database files are stored in plain text, and are human readable. It is possible, though not necessarily advisable, for you to edit the databases by hand, or auto-generate them with a custom script. To find the actual database files, look in the /home/lanforge/DB/ directory on the LANforge machine. The current configuration is saved to the 'DFLT' database every 30 seconds. A backup database will be also saved every 10 minutes with the name 'day_XXX' with XXX corresponding to the ordinal (Julian) date. To save the current database under specific name, enter it in the Name field and click the Save button.
- The Virtual Shelf panel lists each LANforge data generating unit (Resource) assigned to a virtual shelf. A virtual shelf is simply a method of grouping Resources into logical collections. Each Resource is assigned to a shelf when initially configured.
Each Resource has a certain number of 'ports' displayed which are color-coded according to their function:
- Blue: Management port for each Resource
- Green: Data-generating ports
- Yellow: Ports configured in the database but non-existent (or not yet discovered) on the real hardware
- Red: Ports configured to be ignored by the client
The color of the two small squares to the left of each 'port' indicate the current Link Rate and Link Status for that port. Some drivers may not support port-speed reporting in a manner that LANforge can detect, but LANforge will continue to function normally other than reporting the wrong link speed. The leftmost square (Link Rate) will be:
- Purple: 10Gbps
- Orange: 1Gbps
- Green: 100Mbps
- Yellow: 10Mbps
- Red: No Link
The middle square (Link Status) will be:
- Green: Full-Duplex
- Yellow: Half-Duplex
- Red: No Link
The port layout is specified in a config file for each Resource and should have been configured correctly during installation. The tool-tip for each port indicates the interface identification, alias, and port status. Clicking on a port displays the Port Mgr tab with the specified port selected (highlighted) to provide detailed information.
-
Netsmith: Virtual Network Configurator
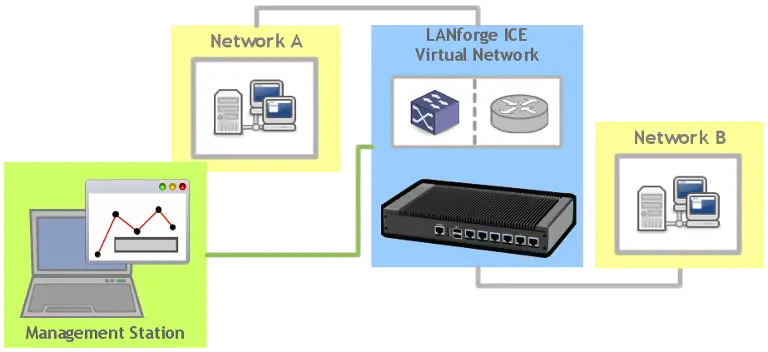
LANforge includes the Netsmith graphical configurator for virtual routers, LANforge-FIRE, and LANforge-ICE testing scenarios. Please be aware that the Virtual Router functionality only works when the LANforge resource servers are running on Linux. The updated iputils program and the Candela kernel (or a kernel with the Candela patch applied) are also required. If you purchase a LANforge system (as opposed to software-only), this will all come pre-installed. If you are installing the software on your own system, please read the install guide(s) carefully.
Open Netsmith by clicking the Netsmith button located below the resource of interest on the Status tab Virtual Shelf panel. When the Netsmith tool is first opened, it will auto-create as much as possible based on the current system configuration and resources. The positioning of the objects will most likely need to be changed. For most objects, just click-and-drag them to the new location using the mouse. Some objects, such as FIRE cross-connect (CX) representations are not independently draggable, but you can drag the port endpoints to reposition the FIRE CXs.
Click on the magnifying glass icons on the upper left of the Netsmith display to zoom-in, reset to default, and zoom-out, respectively.
Objects can be easily moved within the Netsmith display to suit your personal preference. Individual objects can be moved by left-clicking and draging to the new location. A selection box can also be created to move a group of objects by first left-clicking and draging to outline a box of the desired size. The selection box with its contents can then be dragged to a new location on the Netsmith display. The location of the selection box can be fine-tuned by using the left/right/up/down arrow keys while holding down the Ctrl key. Single objects can be moved in a similar manner by first selecting them with a single mouse click. Once the object is in the desired location, click the Apply button to save the changes.
In general, you can click-and-drag to move, double-click to modify, and right-click on objects to get a menu of available actions for each object or group of objects.
Here is an example of how to create a simple routed network emulation using three physical ports and one virtual router. This will emulate a central location with a 10Mbps network connection, and 2 remote sites with 1.54Mbps T1 connections, all connected through a routed network.
For more examples, please see the LANforge-GUI FIRE Cookbook and LANforge-GUI ICE Cookbook.Virtual Routers
To create a new Virtual Router, right-click in a blank area within the Netsmith window and select 'New Router.' This will bring up the Create/Modify Virtual Router window:
LANforge will generate a name automatically unless one is entered. The name, graphical size, notes field and other router configuration flags can all be modified when created or at a later time. The virtual router will use simple subnet routing rules unless otherwise directed. Xorp must be installed before using the following routing features: OSPF, Multicast, RIP, Xorp SHA, or BGP.
Use OSPF Select this checkbox if the virtual router is to use Open Shortest Path First (OSPF) routing protocol. Multicast Routing Select this checkbox if the virtual router is to route multicast traffic. NOTE: IPv6 multicast routing is not currently supported, but IPv4 works fine. Use OLSR Select this checkbox if the virtual router is to use Otimized Link State Routing (OLSR) protocol. RIPv2 Select this checkbox if the virtual router is to use RIP for IP Version 2. RIP Dflt Route Select this checkbox if the virtual router is to accept default-routes from RIP peers. Xorp SHA This function is specific to a particular OEM. IPv6 Router Select this checkbox if the virtual router is to route IPv6 traffic. IPv6 RADV IPv6 RADV protocol will automatically assign IPv6 addresses to other hosts on network interfaces in this virtual router. A patched version of radvd may be required to support this functionaly as older version do not properly deal with the virtual interface names that LANforge uses. Contact your vendor if you have questions. BGP Router Selecting this checkbox enables Border Gateway Protocol (BGP) checkboxes and BGP Configuration Information fields.After creating a virtual router, existing interfaces can be dragged into it or new virtual devices can be created and associated to it. In order to be accessible to outside objects, however, the Virtual Router must either contain an interface (Port) that connects to the outside world or be connected to another Virtual Router that eventually connects to the outside world.
Netsmith Connections
Netsmith Connections are used to connect routers to each other and to connect routers to the outside world. To create a new Netsmith Connection, right-click in a blank area within the Netsmith window and select 'New Connection.' This will bring up the Create/Modify Connection window:
You can choose up to 4 ports and one WanLink to be part of this connection. The number and combination of ports/WanLink selected changes the behavior significantly. In the example below, it is assumed that Port-1 will be the 'outside' port, but Router Connections do not have an inherent direction...it all depends on how you configure it.- Port 1-A will be the name of the local port. If you want this connection to connect to the outside world, use a real device such as eth1 or perhaps an 802.1Q VLAN device for this value. If you want to use this connection to connect two virtual routers, then choose the default <Auto Create New Port> option and a redirect-device (rdd) will be created when the changes are applied.
- Port 1-B will be the name of the local B port. If you want this connection to connect to the outside world, this should be skipped. If you want to use this connection to connect two virtual routers with a WanLink (Network Impairment) included, then choose the default <Auto Create New Port> option and a redirect-device paired with Port 1-A will be created for you when the changes are applied.
- WanLink will be the name of the WanLink (LANforge-ICE) that connects the local ports to the remote ports. If you skip one of the B ports, then the WanLink will connect to the A port. If you skip both B ports, the WanLink will connect the two A ports directly. If both B ports are active, the WanLink will connect the two B ports (assuming the B ports are redirect-devices associated with the A ports) so that the A ports are logically connected to each other through the B ports via a WanLink bridge. If you want to connect two routers without using a WanLink (e.g., to reduce the number of WanLink licenses) both B ports and the WanLink can be skipped. This last case assumes that the A ports are (or will be) a pair of redirect-devices.
- Port 2-B will be the name of the remote B port. Skip this port If you want the remote side of the connection to connect to the outside world. Otherwise, choose the default <Auto Create New Port> option and a redirect-device paired with Port 2-A will be created for you when the changes are applied.
- Port 2-A will be the name of the remote A port. If you want the remote side of the connection to connect to the outside world, this should be a real interface, such as eth2 or perhaps an 802.1Q VLAN device. If you want to use this connection to connect two virtual routers, then choose the default <Auto Create New Port> and a redirect-device paired with Port 2-B will be created for you when you apply the changes. If you want to associate a port to a virtual router without any WanLink emulation, you can skip Port 2-A and have a stand-alone port that can be dragged into a router. This is the default case for newly discovered non-redirect device interfaces.
- NAT is the option to configure an interface on the Netsmith connection to perform Network Address Translation on the outgoing packets. NAT can be also be performed on an interface not associated with a Netsmith connection such as ethX. Please note that while LANforge NAT works properly, LANforge does NOT support any automatic firewalling at this time. That means that if the routing supports it, network connections can originate outside the NAT and route internally. There are ways to enable custom scripts to set up firewalling if that is required: Contact your vendor for more details.
- DHCP is the option to configure an interface on the Netsmith connection to serve Dynamic Host Configuration Protocol using a LANforge generated dhcpd.conf file. DHCP can be enabled on any interface within a virtual router.
- Custom DHCP is the option to configure an interface on the Netsmith connection to serve DHCP using your own dhcpd.conf file.
- Cand-RP is used for multicast routing. Selecting the Cand-RP checkbox will designate this connection as the Candidate Rendezvous Point for its associated router to use in its bootstraping logic. The selected interface should be one that is visible to all other multicast routers in your network. If one is not selected, LANforge will select one for you.
- Interface-Cost is the option to configure an interface on the Netsmith connection with an OSPF route cost. OSPF will choose routes with lower costs when possible.
- RIP-Metric is the RIP interface metric for the connection. Valid entries are 1-15 (15 = infinite).
- OSPF Area is the OSPF area for the interface. If unsure, set to the default of 0.0.0.0
- Next-Hop is the next router gateway to be used by packets leaving on a router-connection. This can be used to help LANforge route to external networks when using static routing. For OSPF networks, the OSPF network will take care of all route discovery automatically.
- Up to 8 additional Subnets can be specified to lie beyond this connection. This will influence the routing tables for the virtual routers, and should correspond to the subnets in the user's network-under-test. The Next-Hop gateway will be used for packets destined for these subnets. Please note that 0.0.0.0/0 is a valid subnet, and efectively means the default gateway for the entire cluster of virtual routers.
Right-Click Menus
Most objects have right-click menus associated with them to perform various actions. You cannot click on the connecting lines or the 'B' ports at this time.
- Connection Endpoints support Display Wanlink, Connect (to a previously selected endpoint), Modify, Toggle WanLink (on/off), Modify WanLink, Modify Port, Create Ports (create VLANs on the selected interface), Sniff Port (with Wireshark protocol analyzer), Reset Port, Delete Port, Delete WanLink, Delete (Router Connection). Please note that if you delete a connection endpoint, any previously auto-created WanLinks or virtual devices associated with that connection will also be deleted when you apply the changes. Deleting ports and WanLinks take affect immediately, so be careful!
- Virtual Routers support New Connection, Modify, Show Routing Table (as is currently configured in the kernel), and Delete. Deleting a Virtual Router will not delete any Router Connections.
- Fire CXs (various traffic-generating LANforge cross-connects) cannot be dragged, but they do support right-click actions: Display, Toggle (on/off), Start, Stop, Modify, and Delete. WARNING: There is no confirmation for these actions, including 'Delete', and they are applied immediately upon choosing the action.
- Peer ICE CXs are WanLinks associated with a particular connection but not currently running. If you have 3 WanLinks between the same two ports, only one can be running at a time: One will be shown as the central connection, and the other two will be shown as Peer ICE CXs. The Peer ICE CXs support these right-click actions: Switch (to running this WanLink), Modify, and Delete. WARNING: There is no confirmation for these actions, including 'Delete', and they are applied immediately upon choosing the action.
- A Selection Box can be created by left-clicking on an empty space and dragging and releasing the mouse. One can then drag the selection box and everything it includes to a new location. It also supports some right-click group actions, including: Display, Toggle, Start, Stop, Modify and Delete. Not all objects contained in the box may support every option, and in that case, they will be silently ignored with no ill affect. WARNING: There is no confirmation for these actions and they are applied immediately upon choosing the action.
Visual Display
The Netsmith window provides a real-time view of WanLinks and other LANforge entities. A movable legend is displayed in the upper-left portion of the Netsmith window. Edge ports appear as solid black squares and are accompanied by a red outline if the port has no link. Any objects drawn as a solid red square are not currently found in the LANforge system, even though the Netsmith has been configured such that they (should) exist. This can happen if interfaces or WanLinks were removed after Netsmith had discovered them, or if new WanLinks or connections have been created in Netsmith, but the changes have not been Applied yet. If these should really be deleted, just right-click and delete the offending objects and Apply the changes.
- For WanLinks, a perpendicular green bar indicates it is running, and a red bar indicates it is stopped. A parallel traffic-throughput box is also drawn to indicate WanLink activity over the last 3 seconds. The green graph indicates the percentage of network utilization flowing towards the interface it faces. The red graph reports the percentage of dropped packets vs. transmitted packets over the last 1 minute.
- LANforge-FIRE connections are shown associated with their endpoint interfaces. They are drawn light-blue if stopped, and darker blue if running.
- Port Relationships ports will have orange connections to their parent object (for instance, an 802.1Q VLANs parent will be the the ethernet or other lower-level network device.) Bridge devices will be connected to the interfaces contained in the bridge device by dark blue lines. If the bridge is configured to own a device, but it is not currently configured as such by the kernel, then that line will be a purplish color. The purple color indicates not all may be as desired, so you may need to modify or reset the bridge device.
Display Options
The checkboxes at the bottom of the Netsmith window can be used to display or hide various details to suit the user's preference. Selecting or deselecting these flags will not affect the actual configuration of LANforge in any way.
Netsmith Buttons
There are several buttons at the bottom-right of the Netsmith window.
- Help shows this help information in a web browser.
- Print will print the entire diagram, resizing it to fit onto a single page. One might choose to print it to a PDF printer and expand the PDF for very high-resolution viewing of a complex network configuration.
- Sync will re-read the current LANforge configuration and re-draw the Netsmith window appropriately. This will cause un-saved changes (such as Virtual Router and Router Connection modifications) and positional changes to be lost. The Sync function may be required to display some newly created WanLinks and virtual interfaces in the Netsmith window.
- Apply will force all changes to the LANforge server. It will auto-create any virtual devices and WanLinks that have been added to Netsmith since the last Apply. It will also cause the router to re-calculate all of the Virtual Router routing tables and configuration. You must Apply the changes after creating, deleting, changing virtual-router/connection associations, and when you change the port IP addresses for the changes to take full affect. For large numbers of virtual routers, Apply can take several minutes. The progress bar will update as the work completes.
- Cancel Apply stops the current 'Apply' process. This can often leave the virtual router configuration in a bad state, so you should make whatever changes you require and then re-apply.
- Close closes the Netsmith window without applying any further changes.
-
Client Administration and Client Login
The LANforge security and administration framework has a concept of Clients (users), Test Managers, and Cross-Connects. A Test Manager is a grouping of one or more Clients and zero or more Cross-Connects. Any Client registered with a Test Manager can manage any of the Cross-Connects assigned to that Test Manager. As a special case, WanPaths can also be assigned to a Test Manager.
When you first log into the LANforge system through the GUI, you will be logged in as the user 'default'. The GUI will then try to log you in as user 'Admin'. If a password has been set for Admin and if the user 'default' does NOT have Administrator privileges, that login will fail and the login window will pop up to allow the user to change users and/or enter the correct password. If only a few different testers will be using LANforge at a given time, you may never need to create a new user. And if you are not concerned about who uses LANforge, there is no need to set an Admin password. It may be useful, however, to do so if you have a larger group of users or if communication between the users is not easy.
To log in as a particular user, select 'Client Admin or Login' from the Control pull-down menu. You will get a screen that looks like this:
Existing clients are displayed in the left panel. To view or modify client details, double-click the name in the left panel. Client details including name, Admin status, and some other flags are displayed on the right. Click Set to save any changes. To log in as a Client, double-click the client name in the Existing Clients list, enter a password if one is set, and click Login As. To create a new Client, enter a new name, set appropriate flags, enter a password if desired, and click Set. To delete an existing Client, double-click it, and click Delete.
Flags
Administrator If enabled, the user will not be restricted in what it can do. Send Endp Updates If enabled, endpoint updates will automatically be sent to this Client. In most cases, this should be disabled since the GUI will request updates as appropriate. Send All Updates If enabled, endpoint, Port, and other updates will automatically be sent to this Client. In most cases, this should be disabled since the GUI will request updates as appropriate. Brief CLI Output This has only minor affect on the output of the CLI text interface. It should usually be enabled, but does not make much difference either way.Creating a Client for use by the CLI interface can be done through the GUI as well. Unless you are using some sort of scripting program to control the CLI, it is advised that you uncheck both Send Updates flags, or the CLI will be so noisy that you will not be able to see what you are doing!
Securing LANforge
By default, LANforge requires no password and the GUI will log in each Client as a super-user. To make LANforge more secure, deselect the Administrator flag from the default Client, then set a password for the Admin Client. You cannot set a password on the default Client, and a 'default_tm' Test Manager will always exist with the associated 'default' Client. To restrict the default Client's access, create a new Test Manager that does not include the default user, and add Cross-Connects to it.
Passwords may be reset by any Client selected as Administrator. Passwords are stored in a plain text file on the LANforge server at [LANforge-Home]/DB/passwd. If this file is deleted, all Clients will be able to log in without a password. This password protection will help keep Clients from accidentally interfering with configurations that they should not have access to, but should NOT be considered a serious means of securing the LANforge machine.
Please NOTE: LANforge is not designed as a highly secure application. You should ensure that the LANforge system cannot be accessed by un-authorized users on IP ports 4001 and 4002 through the use of firewalls or similar restrictions. Please contact LANforge support if you need more detailed information on securing LANforge.
-
Test Managers
A Test Manager is a construct that represents a particular view into the LANforge system. In most cases, the default Test Manager can satisfy routine uses and the creation of addtional Test Managers is not required. Each Test Manager can have a selection of Cross-Connects and a list of Clients who are authorized to use the Test Manager. This allows one to set up multiple different tests on a LANforge system and quickly change the view to different test sets.
To create a new Test Manager, select the Test Mgr tab and click Create. This will bring up the Create/Modify Test Manager window:
- Enter the name of the new Test Manager. Almost all names in the LANforge system are restricted to 15 characters and cannot contain spaces.
- If you are just starting, there will be no Cross-Connects to register or free, but after the system has been configured, you may adjust the Cross-Connects that belong to a given Test Manager by adjusting the top panel of the Create/Modify Test Manager window.
- You will need to register at least one Client with the Test Manager if you want to do any useful work. Unless you have created your own Client, you should add the 'default' and 'Admin' Client at this time. Registering a Client with a test manager means that Client has permission to modify and use all resources associated with that Test Manager.
- Click the Apply button to send the changes and keep the window open for other modifications, or click OK to send the information and close the window.
After creating the Test Manager, the Test Mgr tab will display a summary of all existing Test Managers, including the one just created. To modify a Test Manager, select it and click the Modify button. This will bring up the Create/Modify Test Manager window described above.
-
Layer-3 Cross-Connects (FIRE)
Layer-3 Cross-Connects represent a stream of data flowing through the system under test. A Cross-Connect (CX) is composed of two Endpoints, each of which is associated with a particular Port (physical or virtual interface). The Layer-3 tab displays connections 0-200 by default. Connection numbering is 0-based where 0 represents the first connection name. To display all connections or a specified range of connections, select 'all' from the View field drop-down menu or enter range values ([min]-[max]) in the View field, then click the Go button to display the new range of connections.
Creating & Modifying Cross-ConnectsWhen creating a Cross-Connect (CX), the details of each Endpoint including the Shelf, Resource, and Port that the Endpoint resides on need to be specifed. In this way, you determine which data-generating port (which is connected to some port on the system under test) the CX's traffic will flow over. In order to create a CX, click the Create button on the Layer-3 tab which will bring up the Create/Modify Cross Connect window:
After the desired settings have been entered, click Apply or OK to create the Cross-Connect.
NOTE: A series of tests based off the current configuration can be created by clicking the Batch-Create button.Cross Connect Information
The top panel of the Create/Modify Cross Connect window contains information relating to the entire CX, including the name, CX Type, Report Timer, and the Test Manager. The CX name must be unique in the LANforge system and should have no spaces and be no more than 15 characters in length.
CX Type The CX Type determines the protocol that the CX will use and are selected from a drop-down menu. The current supported types are:- Ethernet passes a custom protocol over raw ethernet. This type of traffic is constrained to a local LAN (it cannot be routed). This is a good way to test pure packet throughput at the Ethernet level, and will show many types of link layer faults, like corrupted packets, dropped packets, and so forth that the higher level protocols might not show.
- Custom Ethernet can be used to specify the exact pattern of bytes to transmit onto the Ethernet wire, including the Ethernet header. Additionally, the LANforge replay feature can replay Ethernet packets captured by LANforge-ICE, Wireshark or any other application that supports the 'pcap' packet capture format. When replay is selected, LANforge plays the packets exactly as they were captured, including the same Ethernet headers, transmission rates, etc. You may choose the Dest Mac option to re-write the destination MAC address for the packets being replayed. This may help make sure the network under test accepts the packets. To replay a capture file, select the appropriate filename for each endpoint. For more information on generating the capture files, please see the Dump Packets notes in the LANforge-ICE section. LANforge can also replay standard pcap format packet dumps.
This connection type also activates a GUI feature that allows you to build your own custom TCP/IP packets. Because LANforge has almost no control over what you send, it cannot detect received packets on the other end of the connection. You can use traffic sniffers or look at the port counters to get ideas of how many packets were actually received. See Configuring Payloads.
- UDP traffic is a non-stream oriented IPv4 protocol that is commonly used for streaming video, music, and other real-time (and possibly lossy) protocols. UDP can be routed, so it is not constrained to the local LAN like the Ethernet protocol is.
- UDP6 is similar to UDP, but uses the IPv6 protocol.
- Custom UDP connections let you specify the exact bytes to transmit as the payload of a UDP datagram. This might be useful for simulating RTP, for instance. See Configuring Payloads.
- TCP is a stream based protocol that carries the vast bulk of the Internet's traffic. It is routable, and it will re-transmit packets that are dropped, so the only packets LANforge should show as dropped are those that are still in the kernel buffers, or those in transit when the CX is stopped. LANforge can report the number of retransmitted packets on Linux. This provides an estimate of dropped frames, but TCP may also retransmit on an overly delayed packet that was not actually lost.
- TCP6 is similar to TCP, but uses the IPv6 protocol which provides a much larger address space and is expected to replace IPv4 sometime in the future.
- Custom TCP connections let you specify the exact bytes to stream over a TCP/IP connection. LANforge has no way of knowing where one of your 'packets' starts or ends, so it cannot detect dropped or mangled bytes on the receive side. You can use the bytes sent and received counters to get a good idea though. See Configuring Payloads.
Cross Connect Endpoints
The lower two panels in the window are used to define endpoints A and B. Endpoints are generally symmetric for UDP and Ethernet. For TCP/IP, the TX endpoint acts as a client, and the RX endpoint acts as a server (it waits for connections). Selecting different options may enable/disable certain fields.
Endp Name Endpoint names must be no more than 15 alpha-numeric characters and contain no spaces. Shelf Logical grouping for LANforge systems. In most configurations the only, and correct, choice is 1. Resource The machine on which this endpoint should reside. Port The physical or virtual interface with which this endpoint should be associated. Pld Pattern The payload pattern for the data generated by LANforge:Increasing: A pattern of bytes repeatedly incrementing from 0x00 to 0xFF. Decreasing: A pattern of bytes repeatedly decreasing from 0xFF to 0x00. Random: A pattern of random bytes from 0x00 to 0xFF. This pattern is generated for every packet sent and hence is CPU intensive. Random-Fixed: A pattern of random bytes from 0x00 to 0xFF is created for the first packet and then duplicated for subsequent packets. Zeros (0x00): A payload of only zeros. Ones (0xFF): A payload of all 0xFF. CUSTOM: A user-specified payload pattern. PRBS-4-0-3: A payload pattern from a 4-bit linear shift register. PRBS-7-0-6: A payload pattern from a 7-bit linear shift register. PRBS-11-8-10: A payload pattern from a 11-bit linear shift register. PRBS-15-0-14: A payload pattern from a 15-bit linear shift register.
Src MAC This is only used when configuring un-managed endpoints. See below for more information on unmanaged endpoints. IP Addr When using secondary IP addresses, you may choose the primary or any of the secondaries for each endpoint. You may also choose to use a random IP address or do a linear walk of all addresses on the configured interface (Port).When using random or linear IP addresses, the connection logic should be configure to only run for a limiated duration (see Min Duration). Internally, this will cause LANforge to stop and restart the connection when the duration is completed, choosing a new IP address and/or IP port as needed.
For un-managed endpoints, it specifies the destination IP address for the peer interface.
Min/Max IP Port If left 'AUTO', the LANforge system will select the IP ports for both transmit and receive endpoints. The user can also specify a particular IP port, but should be aware of potential port conflicts with other LANforge tests and third-party services running on the Linux machine. Endpoints will send traffic with the source IP port as specified, and peer endpoints will send to that port.To send traffic to a specific port without expecting a response from the target, the destination port can be specified by making the receive endpoint UnManaged and specifying the destination IP and IP Port.
If configured to make many connections with the TCP Duration option, set the IP Port to 0 (zero) or use a large range on the 'A' endpoint. Using 0 means that the OS can choose any local IP port that it wishes when making the connections. A previously used IP port will not be usable for a short timeout period (30+ seconds typically). These timers are configurable in most operating systems...contact support if you have questions.
Min Tx Rate The minimum transmit rate that LANforge will attempt to send, in bits per second. This value is not applicable for the packet-capture replay function as the packets are replayed at the exact rates they were captured. Max Tx Rate The maximum transmit rate that LANforge will attempt to send, in bits per second. If this is greater than the min-tx-rate, then LANforge will vary the speed between the min and max creating a random stairstep pattern of data transmission over time that randomly returns to the min-tx-rate. That is, the traffic distribution is a random rate and random duration burst with random intervals between bursts. The bursts are bounded by the Min and Max TX Rate. Traffic will initially be sent at the Tx Min rate. This value is not applicable for the packet-capture replay function as the packets are replayed at the exact rates they were captured. Min/Max Pkt Size The packet size, in bytes. The packet size includes only the bytes for the selected protocol. For instance, if you select a 1472 byte packet for a UDP connection, the ethernet frame will actually be 1514 bytes in length because of the addition of the 14 bytes of ethernet header, the 20 bytes of IP header, and the 8 bytes of the UDP header. When configuring an Ethernet connection, you would select a length of 1514 to create a packet of 1514 bytes since there is no underlying data protocol.If the maximum is larger than the minimum, then each packet will be a random size between min and max.
NOTE: When using IPv4 or IPv6 multicast, LANforge may have trouble receiving PDUs that span multiple frames. So, a maximum payload size of 1472 is suggested. Please contact support if you want more details on this restriction.
IP ToS For IP based protocols, you can specify the ToS (aka QoS) bits in the IP header. This can be useful for testing QoS settings in the device under test. You can select one of the values from the drop-down menu or enter your own value. The following website might be helpful in decyphering ToS and DSCP values: http://www.speedguide.net/tcpoptimizer.php#advanced, http://www.tucny.com/Home/dscp-tos.NOTE: When running LANforge in Windows, QoS must first be setup by following the instructions in the Microsoft Knowledge Base article 248611: http://support.microsoft.com/default.aspx?scid=kb;EN-US;q248611
TTL This specifies the 'time-to-live' when configuring Multicast endpoints. It does not apply to other prototocols at this time. Min/Max Duration This specifies how long the connection will run before it is torn down and reestablished. For instance, this option can be used to test how many TCP connections per second a firewall can handle. If you want a single long running connection, just use 'Forever'. Otherwise, select the number of milliseconds the connection should run before it is reestablished. NOTE: You should set the IP Port to 0 (zero) or use a large port range on the endpoint A (this is the endpoint that originates the connection) when setting TCP Duration to values other than 'Forever'. Min/Max Reconn This determines how long to wait before initiating a new connection. This only takes affect when using Min/Max duration. Pkts to Send Entering a number in this field will quiesce the endpoint after the specified number of packets have been sent. Quiesce Instead of stopping both Connection Endpoints immediately, LANforge will gracefully stop the transmitting Endpoint and wait the selected number of seconds before stopping the receiving Endpoint so that all transactions may be completed. Multi-Conn LANforge now supports running Endpoints in separate processes to make optmimal use of multi-core CPU systems. In addition, it is now possible to create multiple TCP connections for TCPv4 and TCPv6 Cross-Connect types. The first option of simply running the Endpoint in a separate process involves setting Multi-Conn to 1. This works for UDP and TCP Layer-3 Cross-Connects.To enable multiple concurrent connections in a single TCP cross-connect, use '1' for the 'B' endpoint (since it acts as the server-side socket) and then set the connection count in the A endpoint. For instance, if you wanted 5000 TCP connections to test your firewall, set Multi-Conn to 5000 on the A endpoint, and 1 on the B endpoint.
The settings for the endpoint (rate, packet size, etc) will be the same for each of the multi-connections. So, if you have Multi-Conn of 5000 and a min/max speed of 100kbps, LANforge will attempt to generate 500Mbps of traffic. The statistic totals for all multi-connections will be reported in the single Cross-Connect.
Running multiple thousands of multi-connections is much more efficient than running thousands of regular Layer-3 connections in LANforge, but it still uses up resources. It is suggested that you ramp up your load slowly at first to make sure your system has enough RAM and CPU power to handle the load.
NOTE: Some advanced features, such as using IP address ranges, cause the endpoints to be started and stopped. When this happens to multi-conn endpoints, the counters for the previous run will be cleared each re-start. This limitation may be fixed in future releases if it becomes a problem.
Filename This field is only available when the Replay File checkbox selected. For the Custom-Ethernet protocol, this selects the filename for replaying a previously captured stream of packets. The file capture protocol must be pcap or the proprietary format saved by LANforge-ICE.For other protocol types, the file data will be used as the protocol payload. This would be somewhat similar to a file-transfer protocol such as FTP or HTTP.
Dest MAC The destination MAC address to be used when replaying a packet capture. This is useful for replaying captured files against a different router than was originally sniffed. The MAC should address should be that of the router's interface connected to LANforge. Flags & Options Several flags (checkboxes) are used to enable or disable certain features which affect the behavior of the selected endpoints. Dest MAC is only valid for Custom Ethernet connection types.- Checksum will cause LANforge to perform a 32-bit CRC calculation for the payload. This gives a very high degree of packet corruption detection at each layer, but due to the extra work the CPU has to do, the maximum traffic rates may be smaller. Note that TCP/IP, and the ethernet protocol itself already has CRC checks, so you may not need to enable LANforge checksumming.
Received bit-errors will be calculated in the LANforge payload portion starting 28 bytes into the UDP or TCP payload. In addition, the bit-errors are only checked when LANforge CRC is enabled and detected to be invalid. If the 28-byte header is corrupted, LANforge will not detect it, and may also give false positives for other packet errors. Bit-Errors are only calculated for certain payload patterns: Increasing, Decreasing, Zeros, Ones, and the PRBS patterns.
Bit-error results will be displayed on the L3 Endps tab under the RX BER column for each endpoint.
- UnManaged designates an endpoint as not controlled by LANforge. This can be used to fling UDP packets at some third-party application, for instance. It would be less useful for testing TCP in most cases.
- Rcv Mcast designates the endpoint as a multicast receiver as opposed to a sender.
- Replay File will replay the previously captured packet stream specified in the 'Filename' field for Custom-Ethernet connections. For other types, the file contents will be used as payload for the selected protocol.
- Loop will replay a file in an endless loop until the user stops the test.
- Dest MAC enables the Dest MAC field to specify the destination MAC for all packets being replayed. This is only supported when replaying packet capture files.
Batch-Create Cross-Connects
A series of tests can be created based on the CX Name and other current settings in the Create/Modify Cross-Connect window by using the Batch-Create function. For best results, create a valid connection for the first in the series to be batch-created, select the connection and click Modify. Clicking the Batch-Create button at the bottom of the window will pop up the Layer-3 Batch Creator:
After the desired settings have been entered, click Apply or OK to create the series (batch) of Layer-3 Cross-Connects.
Quantity The number of Layer-3 connections to batch-create, using the selected Cross-Connect for the initial values. Number of Digits The number of characters (padding) to be used in appending each connection name. Adds leading zeros (zero-pads) to connection names as required (this may help with sorting connections). For best results, this number should match the format of the selected connection (Ex: 3 for an initial connection named LFtcp-001). Zero Padding Checkbox Uncheck the 'Zero Padding' checkbox if you do not desire leading zeros for the connection names when they are created. Starting Name Suffix The first number in the series (Ex: 001 for LFtcp-001) from which subsequent connections will be incremented. If the original connection name ends in a number or series of numbers, it will be displayed here. Name Increment Connection Names in the batch will be incremented by this amount. If set to 2, the next connections following cx-001 would be cx-003, cx-005, etc. Port Increment A/B Ports used for each connection will be incremented by this amount. If set to 2, then eth2 would be incremented to eth4, eth6, etc. IP-Port Increment IP-Ports used for each connection will be incremented by this amount if the IP-Port field is not set to AUTO. If set to 2, then IP-Port 1234 would be incremented to 1236, 1238, etc.
Custom PayloadsThe Payload button allows for the configuration of custom payloads if a custom CX Type has been selected. A payload from a previous packet capture can be copied/pasted or one can be created by entering data into the various fields. For a Custom Ethernet Endpoint, clicking the Defaults button followed by Apply in each panel of the Configure Payload window will create a payload that looks something like this:
As you fill in the lower protocol layers (for instance, the Ethernet header), other protocol builders will be added to the GUI display as selected. For example, if you choose the IP protocol in the Ethernet header, the IP builder will appear. It will parse the top ascii-HEX window if possible and initialize its fields appropriately. From the IP protocol builder, you can choose TCP as the next layer, and the TCP builder will appear. Clicking the Apply button in each panel transfers the hex to the appropriate portion of the payload. The Apply All Protocols button at the bottom of the window can be used instead of the individual Apply buttons if desired. When finished, click Apply or OK to save the protocol to the selected endpoint.
Protocol Builders
LANforge supports several protocol builders. If a builder is not available for a protocol you wish to transmit, you can always paste a captured packet, or hand build one in HEX and transfer it to the text editor at the top of the Payload panel.
You can also initialize most protocols to defaults, and the resulting values will correspond to live packets gathered from our network. The ethernet protocol is slightly different, see the notes below. Make sure you initialize from the lower layers up to the higher layers.
Ethernet Header You can specify the Source, Destination and Protocol fields in the Ethernet Header. If you tell this protocol to initialize to defaults, it will grab the MAC addresses from the two ports it is connected to. This may or may not be what you want, so be ready to re-enter the fields accordingly. Selecting the 'Insert MPLS Label' checkbox adds another panel to the window to configure the payload for MPLS (Multiprotocol Label Switching). MPLS Header(s) You can specify one or more MPLS labels in this panel. Multiple MPLS labels can be added creating a "label stack" by selecting the 'Insert MPLS Label' checkbox in each new panel. For details, look up RFC 3031. IP Header You can specify the various IP header fields. For details, look up the venerable RFC 791. If you change a field, you will probably want to re-checksum both the IP header and higher protocols too (in that order). TCP Header You can specify the various TCP header fields. For details, look up the venerable RFC 793. If you change a field, you will probably want to re-checksum the header with the checksum button.Protocol builders for 802.1Q VLAN, ARP, IP-IP, IPX, LLC/SNAP, and MPLS labels have recently been added. Please let us know if there is a particular builder you would like to see implemented and more can be added in a future release.
Advanced Configuration
Clicking the Advanced button on either the TX or RX Endpoint panels allows additional configuration for that endpoint.
Send & Receive Buffer Size Configure socket buffer send and receive buffer sizes. For TCP connections, this correlates to sending and receiving window sizes. Using the OS Default is suggested for most users. Connection Timeout This determines how long LANforge will wait for a TCP connection to establish. This is independent of any TCP level settings, which are controlled by the operating system. Proxy Addr This configures the proxy IP address. This may be used to re-direct LANforge traffic through a third-party proxy system. It is expected that the proxy will properly forward the connection to the other LANforge endpoint. For TCP traffic, the proxy only makes sense on the A endpoint. The Use-Proxy checkbox must be selected to enable these settings. Proxy Port This configures the proxy IP port. This should be used in conjunction with the Proxy Addr described above. Send Bad CRC For layer-2 Ethernet protocols one can also specify the number of frames to be generated with purposefully bad Ethernet CRCs. This 'bad CRC' feature is only supported by certain Ethernet adapters and drivers. Please contact Candela if you wish to use this feature. Src MAC This is used to configure the MAC address of un-managed layer-2 Ethernet endpoints. The peer (managed) interface will then send packets to this MAC. Socket Priority You can use the 'Socket Priority' field to set a particular priority for the generated packets. When used in conjunction with the priority -> .1q priority mapping supported in the 802.1Q VLAN stack on Linux, you can have packets created with particular 802.1Q priorities. You can also use other Linux tools external to LANforge to modify behavior of the packets based on the priority. Socket Priority may influence ToS if the operating system is configured to do so, but it will not do so by default. TCP_NODELAY Selecting the 'TCP_NODELAY' checkbox will decrease latencies in many cases and aid generation of small TCP frames by disabling the connection's Nagle algorithm. Selecting 'TCP_NODELAY' may decrease total bandwidth. Use-Proxy Selecting the Use-Proxy option allows you to direct packets to an intermediate system instead of directly to the peer endpoint. May be useful for testing certain firewall configurations. Linear-IP-Ports This option will cause an IP Port range to be used in a linear manner. For instance, if you use min-ip-port of 5000 and max of 5005, the connections will be made from port 5000, 5001, .. 5005. If you do not select this option, and have an IP port range, a random port between min and max will be used for each connection attempt. Quiesce-After-Range This option will cause the connection to stop after it has completed a linear IP-Port range and/or a linear IP address range.
Cross Connect DisplayIndividual Cross-Connects can be selected for display from the Layer-3 tab. Select a Cross-Connect and click the Display button to bring up a summary window for that cross-connect.
The Cross Connect display is divided into three panels. The left and right panels describe information for endpoints A and B, respectively. The center panel describes the number of confirmed packets flowing and dropped from left-to-right and right-to-left, as indicated by the arrows.
The busy graphs on the right of each panel display the packet latency distributions for each endpoint. LANforge detects latency with a timestamp in each (non-custom) LANforge protocol packet. The precision is to 1 millisecond. If the two endpoints are using NTP protocol to keep themselves in sync, then they are usually within 0-3 milliseconds apart. Because of this, latencies may be negative at times. This just shows the difference in the clocks, and by looking at both sides of the connection, you can deduce the true round-trip latencies. For the best latency measurements, have both the sending and receiving port on the same machine. For even higher precision, consider an Armageddon endpoint, which has microsecond latency reporting.
LANforge only counts the latencies when it receives the packet. This is not exactly the time that the packet was received by the LANforge hardware because the packet must flow through the protocol stacks up to the LANforge server. This is the primary cause of the range of latencies you will see reported even on a simple and fast LAN. The average is usually very close though: It is a running average of the last 100 packets received.
Two latency graphs are displayed for each endpoint. The upper graph reflects latencies counted in the last 30 seconds, and the lower graph for the last 5 minutes. The upper right portion of each display widget lists the average latency (in milliseconds), width, and min/max latency within the respective time period. The color-coded numbers on the upper left of each widget are counters for each latency 'bucket' and are represented by the vertical bar graph below it.
The units for the size of the buckets are milliseconds, and are logarithmic (2^X) in scale. The exponential values (1, 2, 4, 8, etc.) will be multiplied by the bucket 'width' (currently always 1), and added to the minimum latency. For instance, if the minimum latencies for the top and bottom are 30 and 10 milliseconds, respectively, then the range of the first several buckets for each will be:
31: 32: 34: 38: 46: ...
and11: 12: 14: 18: 26: ...
Assuming the minimum is 30, if the bucket "1" has 2000 beside it, then that means that 2000 packets have been received in the last time-period that had less than 31 milliseconds of latency. If the bucket "2" has 30 beside it, then that means 30 packets had latency between 31 and 32 milliseconds.
The minimum latency can change over time, which will cause the buckets to shift their values. Although this may be confusing at first, it allows LANforge to report high-precision data regardless of the latency of the system under test.
When viewing the Spreadsheet output, the lat_0, lat_1, etc columns show the number of packets received in the last 30 seconds that fall into the buckets.
Scripted Cross ConnectAs of release 5.1.2 and later, a Layer-3 Cross Connect can be scripted via the LANforge GUI so that the user can setup a single connection to run at different rates and payload sizes for various durations.
The Add/Modify Script window is divided into two panels. The top panel identifies the endpoint and defines the script type and scripting options. The bottom panel describes the script configuration.
Endpoint Name The Endpoint that the script will control. Script Type There are three Script Types. The default values that appear for RFC-2544 and ScriptWL can be modified to suit your testing needs. The Run and Pause Duration values can also be modified to suit your testing needs. Simply select a value from the list or type in the exact value you want to use. - NONE - Deletes any existing script on the endpoint.
- RFC-2544 - Defines a default set of rates and payload sizes for a scripted Layer-3 or Armageddon endpoint.
You may use the default rates and payload sizes which are described in RFC-2544, a methodology for benchmark testing, or you can modify the default rates and payload sizes by typing in the values you want to use in the script configuration text boxes. - ScriptWL - Defines a default set of rates, latencies, jitter and drops for a scripted WanLink.
- Enable Script Whether or not to enable the use of the script on the endpoint. A script configuration can be defined for an endpoint and then disabled so that the script configuration is preserved for future use when the script is enabled again.
- Show Reports During the running of a script, this option will allow per-iteration and summary results to be generated and displayed in a pop-up text display window.
- Symmetric Symmetric allows the script configuration to apply to both endpoints associated with a connection. This would be used for a bi-directional test. With this option, the script per-iteration and summary results will include both endpoints in a single report.
- Hide Iteration Details Hides only the per-iteration results in the script report. Summary results will still be displayed.
- Hide Legend Hides only the report legend that describes the column headings in the script report.
- Hide CSV Hides only the comma seperated value data in the script report.
- Run Duration The length of time that each iteration should run. Values can be chosen from the list or typed in with one of the following suffixes:
- ms - milliseconds, s - seconds, m - minutes, h - hours, d - days.
- Pause Duration The length of time between each iteration. Values can be chosen from the list or typed in with one of the following suffixes:
- ms - milliseconds, s - seconds, m - minutes, h - hours, d - days.
- Rates A default set of rates is shown when the script type is selected, but you can also enter your own set of rates that each script iteration should step through. Rates can be entered using
- or
- units. Values should be seperated by a comma or newline.
- Payload Sizes A default set of payload sizes is shown when the script type is selected, but you can also enter your own set of payload sizes that each script iteration should step through. Payload sizes can be entered with one of the following suffixes:
- B - Bytes, KB - Kilobytes, MB - Megabytes. Values should be separated by a comma or newline.
Note:- For Layer-3 TCP and UDP, payload size is the size in bytes of just the payload. For Layer-3 Ethernet or Armageddon, payload size corresponds to the actual ethernet frame size.
-
Layer-3 Endpoints (FIRE)
Although the Layer-3 tab will be used to stop/start/modify your (non-IGMP) CXs, the fine details of each Cross-Connect are displayed on the L3 Endps tab. If you select a CX on the Layer-3 tab by single-clicking on its row, the Endpoints associated with that CX will be selected when switching to the L3 Endps tab. The L3 Endps tab displays Endpoints 0-400 by default. Endpoint numbering is 0-based where 0 represents the first Endpoint name. To display all Endpoints or a specified range of Endpoints, select 'all' from the View field drop-down menu or enter range values ([min]-[max]) in the View field, then click the Go button to display the new range of Endpoints.
Bulk changes to Endpoint values can be performed easily via the L3 Endps tab. For example, if you want several of your Endpoints running at 56000bps then you can select them, and use the 'MIN Tx Rate' combo-box to set the desired value. Additional bulk changes can be made to selected Endpoints by clicking the Batch Modify button. Selected values from the drop-down menus will be applied to all selected Endpoints. Endpoint values marked 'NA' will remain unchanged. For more specific modifications, select the Endpoint in question and click the Modify button. Endpoints can also be modified through their respective Cross-Connect on the Layer-3 tab.
If you wish to see graphs for the received packets for a particular Endpoint, you can select one or more Endpoints and click on the Display button. The display of a sample Endpoint is shown here:
Creating & Modifying Multicast EndpointsLANforge supports the IGMP UDP Multicast protocol. Because there is a one-to-many relationship, these Endpoints are not handled by the standard cross-connect paradigm. Instead, you can create multiple Endpoints, specifying one generator and zero or more receivers for a particular IGMP address/port pair. To create an IGMP Endpoint, click the Create button on the L3 Endps tab. This will bring up the Create/Modify Endpoint window. To modify an existing IGMP Endpoint, select it and click the Modify button.
Endp Type The Endpoint Type should be 'Multicast.' Custom Multicast is not supported at this time (please enquire if you are interested in this feature.) Report Timer The Report Timer is how often (in millisecond units) the Endpoint reports to the GUI. 1000-5000 (1-5 seconds) is suggested for most cases. IGMP Address The IGMP Address is the 'IP' address of the multicast group. Multicast IP addresses must be in the range between 224.0.0.0 and 239.255.255.255, inclusive. The IGMP Address and Port specifies a particular multicast group. IGMP Dest Port The IGMP Destination Port is the UDP port that this Endpoint will transmit to, assuming it is a transmitter. If it is a receive-only Endpoint, then this field can be left blank ("IP Port" specifies the receiving port.) IP Port The IP Port is the port that the Endpoint listens to if it is a receiver. If it is a transmitter, then this field can be left at the default setting. TTL The Time-to-Live field determines how far the IGMP packet may travel. '1' restricts travel to the local subnet only. Larger numbers allow it to travel across routers. Be careful not to flood other networks by accident! Rcv Mcast If the 'Rcv Mcast' checkbox is selected, this Endpoint will be a receiver. If not, then it will be an IGMP multicast generator. You should have one generator per unique multicast IP address and port, and zero or more receivers. -
VoIP Call Generator (SIP, RTP, RTCP)
LANforge can create Voice over IP (VoIP) calls between LANforge interfaces. You may also setup third-party phones to call LANforge or be called by LANforge.
VoIP consists of several protocols. LANforge currently supports the SIP (Session Initiated Protocol) emssaging protocol. The voice payload is transmitted with the Real Time Protocol (RTP) which runs over UDP. The Real Time Control Protocol (RTCP) is used for latency and other accounting, and runs over UDP with the same priority as the RTP traffic. The VoIP/RTP tab displays connections 0-200 by default. Connection numbering is 0-based where 0 represents the first connection name. To display all connections or a specified range of connections, select 'all' from the View field drop-down menu or enter range values ([min]-[max]) in the View field, then click the Go button to display the new range of connections.
Creating & Modifying VoIP Cross-ConnectsWhen creating a VoIP Cross-Connect (CX), you specify the details of each Endpoint, including the Shelf, Resource, and Port that the Endpoint resides on. In this way, you determine upon which data-generating port (which is connected to some port on the system under test) the call's traffic will flow. In order to create a CX, click the Create button on the VoIP/RTP tab. This will bring up the Create/Modify VoIP Cross Connect window:
After the desired settings have been entered, click Apply or OK to create the Cross-Connect.
NOTE: A series of tests based off the current configuration can be created by clicking the Batch-Create button.Cross Connect Information
The top panel of the Create/Modify Cross Connect window contains information relating to the entire CX, including the name, CX Type, report timer, and the assigned test manager. The CX name must be unique in the LANforge system.
Report Timer The report timer specifies how often the LANforge data generators send updates to the LANforge server, and how often the LANforge server pushes endpoint information up to the clients (GUIs) that have requested the automatic updates. If you are running the GUI over a slow link, or have a slower machine, it is recommended to increase the report timer to 5000ms (5 seconds) or higher. Test Manager The Test Manager specifies who 'owns' this CX, and can be used to segregate a large LANforge system for use by many engineers. For most users, however, assigning all CXs to the default_tm Test Manager is fine. CX Type The CX Type determines the protocol that the CX will use. LANforge currently only supports SIP. SIP makes a voice call using the SIP messaging protocol. If you are using 'Directed' mode, then the endpoints can call directly to each other without using a SIP proxy server. With the 'Use Gateway' option, a SIP server will be used to handle the call routing. LANforge has been tested with a wide variety of third-party SIP gateways, including Asterisk. Call Modes Two call modes are available: 'Continuous Call' makes a single call and plays the wave file in a loop until the call is stopped by the user. 'Multi-Call' mode allows you to select the number of times to loop the wave file, the number of calls to make, and the maximum time of the call. For PESQ, you should use the 'Multi-Call' option. Call Gateway Options Two Call Gateway options are available: 'Directed' means that the VoIP endpoints directly call themselves, without registering with or using a proxy or gateway. In this configuration most of the endpoint attributes can be 'AUTO' because LANforge can determine the settings automatically. In 'Use Gateway' mode the call endpoints will register with a gateway or proxy and make calls through it. To authenticate and register a VoIP endpoint with a call gateway/proxy use the following format to supply the password: [<password>@]<Call Gateway/Proxy IP | FQDN>[:<port>]Call Duration Min/Max Call Duration determine the length of the call. If 'File' is selected then the call will be as long as it takes to play the chosen wave file. If Min is not equal to Max, a random value between the min and max will be chosen for each call made. For PESQ, select 'File' for the call duration. Max Ring Time Determines how long the calling endpoint will wait for the called party to pick up before deciding the call was a 'No Answer'. Codec Determines the codec for the RTP voice payload. Currently G729, G711u, G726-16, G726-24, G726-32, G726-40 and Speex codecs are supported. By default, the phones will advertise all supported Codecs, with a preference on the one selected here. If you want to only advertise the single selected codec, then also enable the 'Single Codec' checkbox in the Endpoint configuration sections. Start Delay Specifies the amount of time (in seconds) to wait before initiating a call after a test has been started. Number of Calls Specifies the number of calls to make before the endpoint stops itself. Select 'INFINITE' if you want to run until the user stops the call manually. Inter-Call Gap Min/Max Inter-Call Gap specifies how long to wait between calls. If min is not equal to max, a random value will be chosen between min and max for each call. Don't Send RTP By default, LANforge will generate the RTP payload for each call. This requires significant processing resources, so if you only care about the SIP messaging, you can select this checkbox to disable sending of RTP.Cross Connect Endpoints
Each Endpoint can be configured independently of the other. The default is to have the 'A' endpoint call the 'B' endpoint. The 'B' endpoint can be un-managed, which means LANforge assumes that it is a third-party endpoint, such as a Cisco or Grandstream SIP phone.
Name, Shelf, Resource, Port The Endpoint name, shelf, resource, and port information determines the Port (interface) this endpoint will use. Phone Number The Phone Number is the SIP identifier for the endpoint. If you are using a Gateway, then this number must be configured in the Gateway so that the endpoint can register. For directed calls, this can be 'AUTO' and LANforge will choose some random value and make it work. For SIP, if you put in a number, the SIP To/From headers will be number@IP:port. If you want LANforge to use a domain for the To/From headers, then you can enter something like:This email address is being protected from spambots. You need JavaScript enabled to view it. for the phone number. If you are using non-standard SIP ports, then you must specify the SIP port too:This email address is being protected from spambots. You need JavaScript enabled to view it. :50600 Display Name Allows configuration of the SIP Display Name attribute for caller ID. The default is AUTO which will display the phone number. Auth User Name Specify the user in this field if using an authenticating proxy and/or authenticating calls. The phone number will be used if 'AUTO' is selected. Reg Expire Allows you to set the registration expire timer. Flags & Options Several flags (checkboxes) are used to enable or disable certain features which affect the behavior of the selected endpoints.- UnManaged tells LANforge that this particular Endpoint is not a LANforge endpoint. Use this when configuring LANforge to call third-party SIP phones, for example.
- Don't Answer will make LANforge decline to 'pick up' the phone when called.
- Rcv Call configures this endpoint to wait for calls to be made to it, but will not originate any calls.
- Single Codec tells LANforge to only use the codec specified in the top panel of this window. With this function disabled, the specified codec will be preferred, but any supported codec will be advertised and accepted.
- Bind SIP should be checked if the gateway is connected to the same (ethernet) interface as the VoIP endpoint. This is usually required for Directed calls. If you are using the management network for the gateway, then deselect this checkbox.
- Record tells LANforge to record the received audio stream to the specified wav file. This must be selected if you want to enable PESQ reporting.
- Enable PESQ activates LANforge VoIP PESQ automated voice quality reporting. You must purchase a separate PESQ license for your LANforge system in order to enable this feature. To configure the VoIP endpoint for PESQ, select the 'Enable PESQ' checkbox. You must also configure the PESQ server. The PESQ server is the LANforge machine on which you install the PESQ license. PESQ can run along side other LANforge processes, so everything can be installed on a single machine if desired. For optimal results, select the 'Multi-Call' call mode and 'File' for the call duration. You also have to enable the 'Record' feature so that the received audio is saved to the local file system for processing by PESQ.
- Play to speaker tells the LANforge server to play received audio on its speaker, providing a sound system exists and is configured correctly. The default sound device for Linux is /dev/audio.
- VAD (Voice Activity Detection) is supported by SIP and will suppress RTP packets if silence is detected more than the specified 'VAD Delay' in milliseconds.
- Override SDP replaces the connection IP address in the SDP with the 'real' IP address of the SIP peer. This feature should normally be deselected, but it may help if the peer is running through a 'dumb' NAT.
sox muzak.ogg -U -c 1 -b -v 1.1 -r 8000 /tmp/muzak.wav resample -q1
# muzak.ogg == input file, can be almost any type of sound file. # -U == ulaw encoding # -c 1 == one channel # -b == 1-byte encoding (8-bit) # -v 1.1 == increase volume by 1.1/1.0 percent, optional # -r 8000 == 8000 samples per second. # /tmp/muzak.wav == output file, has to be a .wav extension. # resample -q1 == makes it sound better, evidently, I can't tell.
Destination If the destination number/URL to be called is different from the peer endpoint's phone number, you may specify it in this field. Speaker If you have a properly configured sound card, you can play the received call to the speaker real-time. Only a single endpoint can play on a particular machine at the same time. Select the 'Play to Speaker' checkbox to enable this feature. This feature is only supported for SIP, and only on Linux. You can also save the received audio to a file and play it through normal audio programs on any operating system. Call Gateway For 'Use Gateway' calls, you will need to specify the SIP Proxy. The proxy or gateway should usually be located in the system/network under test. This is a potentially complex matter, so please contact Candela Technologies or your supplier if you have any questions. For authenticated SIP registration, append the password to the front of the IP address: [password@]IP[:port] Record File If you want a copy of the received wav file, or if you are using PESQ, enter the filename to which to save the received audio stream. This should be unique for all endpoints so that you do not corrupt other calls' files. PESQ Server To enable PESQ automated reporting, you must have a PESQ license and/or access to a machine running a licensed PESQ server. Enter the IP address of that machine and the port (default port is 3998) in this field. Quiesce Instead of stopping both VoIP Endpoints immediately, LANforge will gracefully stop the transmitting Endpoint and wait the selected number of seconds before stopping the receiving Endpoint so that all transactions may be completed.Batch-Create Cross-Connects
A series of tests can be created based on the CX Name and other current settings in the Create/Modify Cross-Connect window by using the Batch-Create function. For best results, create a valid connection for the first in the series to be batch-created, select the connection and click Modify. Clicking the Batch-Create button at the bottom of the window will pop up the VoIP Batch Creator:
After the desired settings have been entered, click Apply or OK to create the series (batch) of VoIP Cross-Connects.
Quantity The amount of VoIP connections to batch-create, using the selected Cross-Connect for the initial values. Number of Digits The number of characters (padding) to be used in appending each connection name. Adds leading zeros (zero-pads) to connection names as required (this may help with sorting connections). For best results, this number should match the format of the selected connection (Ex: 2 for an initial connection named call-01). Zero Padding Checkbox Uncheck the 'Zero Padding' checkbox if you do not desire leading zeros for the connection names when they are created. Starting Name Suffix The first number in the series (Ex: 01 for call-01) from which subsequent connections will be incremented. If the original connection name ends in a number or series of numbers, it will be displayed here. Name Increment Connection Names in the batch will be incremented by this amount. If set to 2, the next connections following cx-01 would be cx-03, cx-05, etc. Port Increment A/B Ports used for each connection will be incremented by this amount. If set to 2, then eth2 would be incremented to eth4, eth6, etc. Phone# Increment Phone numbers will be incremented by this amount if the Phone # field is not set to AUTO. UDP Port Increment UDP Ports will be incremented by this amount if the UDP Port field is not set to AUTO. SIP Port Increment SIP Ports will be incremented by this amount if the SIP Port field is not set to AUTO. Record File Increment The Record File will be incremented by this amount if the Record File field is not blank. Start Delay Increment Start Delay will be incremented by this amount.
VoIP Call Display PanelIndividual VoIP cross-connects can be selected for display from the VoIP/RTP tab. Select a cross-connect and click the Display button to bring up a summary window for that cross-connect.
The VoIP Cross Connect display is divided into three panels. The left and right panels describe information for endpoints A and B, respectively. The center panel describes the number of confirmed packets flowing and dropped from left-to-right and right-to-left, as indicated by the arrows.
The busy graphs on the right of each panel display latency and jitter distributions for each endpoint over the last 30 seconds. LANforge detects latency with the RTCP protocol. Jitter is determined from the timestamp on the received RTP packets. Note that the jitter calculation is made before the packet is processed by the RTP Jitter buffer.
The upper graphs reflect RTCP latency, and the lower graphs reflect jitter derived from the RTP packets. The upper right portion of each display widget lists average values for latency and jitter, respectively. Min/max values are displayed below the average. The color-coded numbers on the upper left of each widget are counters for each latency and jitter 'bucket' and are represented by the vertical bar graph below it.
The units for the size of the buckets are milliseconds and are logarithmic (2^X) in scale. For instance, if the average latency is 101 milliseconds, then the buckets will be:
102: 103: 105: 109: 117: ...
If the bucket "102" has 2000 beside it, then that means that 2000 packets have been received in the last time-period that have less than 102 milliseconds in latency. If the bucket "105" has 30 beside it, then that means 30 packets had latency between 103 and 105 milliseconds.
-
VoIP Endpoints
Although the VoIP/RTP tab will be used to stop/start/modify your VoIP/RTP Call CXs, the fine details of each Cross-Connect are displayed on the VoIP/RTP Endps tab. If you select a call on the VoIP/RTP tab by single-clicking on its row, the Endpoints associated with that CX will be selected when switching to the VoIP/RTP Endps tab. The VoIP/RTP Endps tab displays Endpoints 0-400 by default. Endpoint numbering is 0-based where 0 represents the first Endpoint name. To display all Endpoints or a specified range of Endpoints, select 'all' from the View field drop-down menu or enter range values ([min]-[max]) in the View field, then click the Go button to display the new range of Endpoints.
Bulk changes to VoIP Endpoints can be performed easily via the VoIP/RTP Endps tab by selecting one or more endpoints and clicking the Batch Modify button. Selected values from the drop-down menus will be applied to all selected endpoints. Endpoint values marked 'NA' will remain unchanged. Endpoints can also be modified through their respective Cross-Connect on the VoIP/RTP tab.
-
Armageddon (Accelerated UDP)
Armageddon Cross-Connects require special Linux kernel features. If you purchased your machine from Candela, then these features will already be included. Otherwise, you should make sure you have installed the kernel patches or a pre-compiled kernel from Candela.
The Armageddon traffic generator can generate UDP packets with various IP and UDP header fields. More importantly, it can generate packets at line speed on 10/100/1000 Mbps and Multi-Gigabit Ethernet networks. Armageddon can also measure latency with 1 microsecond precision, and the sending and receiving ports can be on the same machine.
NOTE: If you are running Armageddon on a flat (non-routed) network, then LANforge can figure out all the defaults for you. However, if you are running in a routed network, you will need to manually enter the MAC address of your router in the Destination MAC field of the Armageddon configuration panel.
Bulk changes to Armageddon Endpoints can be performed easily by selecting one or more endpoints and clicking the Batch Modify button. Selected values from the drop-down menus will be applied to all selected endpoints. Endpoint values marked 'NA' will remain unchanged.
Creating & Modifying Armageddon Cross-ConnectsWhen creating an Armageddon CX, you specify the details of each Endpoint, including the Shelf, Resource, and Port that the Endpoint resides on. In this way, you determine which data-generating port (which is connected to some port on the system under test) the CX's traffic will flow over. In order to create an Armageddon CX, click the Create button on the Armageddon tab. This will bring up the Create/Modify Armageddon Endpoint window:
Cross Connect Information
The top panel of the Create/Modify Armageddon Endpoints window contains information relating to the entire CX, including the name, CX Type, report timer, and the test manager this CX should belong to. The name must be unique in the LANforge system.
CX Type The CX Type determines the protocol that the CX will use. The current supported types are:- Armageddon UDP generates and receives UDP packets. Protocol header fields will default to sane values based on the ports you select, but you can specify or randomize most fields to customize the packets that you send. For generating traffic for a routed network, you may have to override the default destination MAC address with the one from your router. Currently, the payload will just be random bytes from un-initialized memory, except for a small header at the beginning of the UDP payload that LANforge uses to detect dropped and reordered packets.
Cross Connect Endpoints
The lower two panels in the window are used to define endpoints A and B.
Endp Name The unique name for this endpoint. LANforge generates a default value based on the CX Name entered in the top panel. Shelf The virtual 'shelf' for this endpoint. The default of 1 is the only correct answer in most configurations. Resource The LANforge machine that this endpoint should be associated with. Choose from the drop-down values. Port The real or virtual network interface this endpoint should be associated with. Choose from the drop-down values. Pld Pattern The payload pattern is random chunks of memory, and is not currently configurable. Src MAC The source MAC address in the generated packets. If DEFAULT is entered in this field, LANforge will use the MAC address of the configured port for this endpoint. Dst MAC The destination MAC address in the generated packets. If DEFAULT is entered in this field, LANforge will use the MAC address of the peer endpoint's configured port. Min Src IP The source IP address for the generated packets. If DEFAULT is entered in this field, LANforge will use the IP address of the configured port for this endpoint. Max Src IP The source IP address for generated packets. If this value is larger than the Min Src IP, then the generated packets will cycle through the IP address range creating traffic from each IP address. If DEFAULT is entered in this field, LANforge will use the IP address of the configured port for this endpoint. Min Dst IP The destination IP address for the generated packets. If DEFAULT is entered in this field, LANforge will use the IP address of the peer endpoint's configured port. Max Dst IP The destination IP address for generated packets. If this value is larger than the Min Dst IP, then the generated packets will cycle through the IP address range creating traffic to each IP address. If DEFAULT is entered in this field, LANforge will use the IP address of the peer endpoint's configured port. Min Src Port The source IP port for the generated packets. Max Src Port The source IP port for generated packets. If this value is larger than the Min Src Port, then the generated packets will cycle through the IP port range creating traffic from all IP ports. Min Dst Port The destination IP port for the generated packets. Max Dst Port The destination IP port for generated packets. If this value is larger than the Min Src Port, then the generated packets will cycle through the IP port range creating traffic to all IP ports. PPS Tx The desired packets-per-second to transmit. If the hardware/network cannot actually run at this speed, it will run as fast as it is able. Min Pkt Size The minimum packet size. This includes all ethernet headers, but does NOT include the 4 byte CRC at the end of the ethernet frame. The reported bits-per-second and bytes received WILL take the 4 byte CRC into account. Max Pkt Size The maximum packet size. This includes all ethernet headers, but does NOT include the 4 byte CRC at the end of the ethernet frame. If this value is larger than the Min Pkt Size, each new packet will have a random size between min and max, in a random distribution. Multi-Pkt This setting determines the number of times the exact same packet will be transmitted before a new one is created. Setting this value to greater than one can increase performance of the LANforge machine, but it will decrease the chance of detecting out-of-order packets. This is not usually a problem. When using Armageddon on virtual interfaces, such as MAC-VLANs and 802.1Q VLANs, this value must be 0 due to internal driver limitations. Other drivers *may* have this limitation as well. Pkts to Send This specifies the number of packets to send before stopping the test. Set this value to zero to have the test run until stopped by the user. Src MAC Cnt If greater than 1, the source MAC address will be incremented through the specified range. This allows the test to create packets from what appears to be many different ethernet NICs and can be good for stress-testing ethernet switches and other types of equipment that attempt to detect and optimize for network flows. Dst MAC Cnt If greater than 1, the destination MAC address will be incremented through the specified range. This allows the test to create packets to what appears to be many different ethernet NICs and can be good for stress-testing ethernet switches and other types of equipment that attempt to detect and optimize for network flows. Quiesce Instead of stopping both Armageddon endpoints immediately, LANforge will gracefully stop the transmitting Endpoint and wait the selected number of seconds before stopping the receiving Endpoint so all transactions may be completed. Thread-ID The kernel thread on which this endpoint should be running. The default 'AUTO' will use a naive method to spread packet generation load across the available Armageddon threads. When the CPU is not the bottleneck (often on today's hardware), it is usually best to keep all endpoints on the same thread. Use Router MAC If specified, and if Destination MAC is 'DEFAULT', then LANforge will attempt to find and use the MAC of the default gateway for the interface (Port) associated with this endpoint for the destination MAC. This option should always be selected when using Armageddon to test a routed network.
Scripted Armageddon Cross ConnectAs of release 5.1.2 and later, an Armageddon Cross Connect can be scripted via the LANforge GUI so that the user can setup a single connection to run at different rates and payload sizes for various durations.
The Add/Modify Script window is divided into two panels. The top panel identifies the endpoint and defines the script type and scripting options. The bottom panel describes the script configuration.
Endpoint Name The Endpoint that the script will control. Script Type There are three Script Types. The default values that appear for RFC-2544 and ScriptWL can be modified to suit your testing needs. The Run and Pause Duration values can also be modified to suit your testing needs. Simply select a value from the list or type in the exact value you want to use. - NONE - Deletes any existing script on the endpoint.
- RFC-2544 - Defines a default set of rates and payload sizes for a scripted Layer-3 or Armageddon endpoint.
You may use the default rates and payload sizes which are described in RFC-2544, a methodology for benchmark testing, or you can modify the default rates and payload sizes by typing in the values you want to use in the script configuration text boxes. - ScriptWL - Defines a default set of rates, latencies, jitter and drops for a scripted WanLink.
- Enable Script Whether or not to enable the use of the script on the endpoint. A script configuration can be defined for an endpoint and then disabled so that the script configuration is preserved for future use when the script is enabled again.
- Show Reports During the running of a script, this option will allow per-iteration and summary results to be generated and displayed in a pop-up text display window.
- Symmetric Symmetric allows the script configuration to apply to both endpoints associated with a connection. This would be used for a bi-directional test. With this option, the script per-iteration and summary results will include both endpoints in a single report.
- Hide Iteration Details Hides only the per-iteration results in the script report. Summary results will still be displayed.
- Hide Legend Hides only the report legend that describes the column headings in the script report.
- Hide CSV Hides only the comma seperated value data in the script report.
- Run Duration The length of time that each iteration should run. Values can be chosen from the list or typed in with one of the following suffixes:
- ms - milliseconds, s - seconds, m - minutes, h - hours, d - days.
- Pause Duration The length of time between each iteration. Values can be chosen from the list or typed in with one of the following suffixes:
- ms - milliseconds, s - seconds, m - minutes, h - hours, d - days.
- Rates A default set of rates is shown when the script type is selected, but you can also enter your own set of rates that each script iteration should step through. Rates can be entered using
- or
- units. Values should be seperated by a comma or newline.
- Payload Sizes A default set of payload sizes is shown when the script type is selected, but you can also enter your own set of payload sizes that each script iteration should step through. Payload sizes can be entered with one of the following suffixes:
- B - Bytes, KB - Kilobytes, MB - Megabytes. Values should be separated by a comma or newline.
Note:- For Layer-3 TCP and UDP, payload size is the size in bytes of just the payload. For Layer-3 Ethernet or Armageddon, payload size corresponds to the actual ethernet frame size.
-
WanLinks (ICE)
WanLinks support the LANforge WAN/Network emulation feature set called LANforge-ICE. In the default WanLink configuration, two interfaces act like a transparent layer-2 ethernet bridge. The WAN emulation is applied as traffic flows through this bridge. Each WanLink is composed of two WanLink Endpoints that represent one of the sides of the WAN/Network emulation. WanLinks can apply various characteristics to traffic flowing through them including maximum-bandwidth, latency, jitter, jitter-frequency, dropped-packets, duplicated-packets, reordered-packets, bit & byte errors, and more!
If a network's values for probed latency, packet loss and others are captured using LANforge-ICEcap, the resulting XML file can be replayed using the LANforge-ICEcap Replay (WAN-Playback) feature. This will provide realistic WAN emulations based on real-world networks. Please note that LANforge-ICEcap can only probe round-trip latency with any significant accuracy, so other network configurations should be specified manually in most cases.
Overview of WanLink ConfigurationA WanLink emulates a bridged Ethernet network with characteristics determined by the user. Packets are received in one Ethernet (or virtual) interface and are transmitted out the other interface. This means that when you add the LANforge machine to an existing network configuration, no routing changes are needed. When designing your network, you can think of a pair of WanLink ports as an ethernet switch or even just a pass-through cable! WanLinks can bridge 802.1Q VLAN, Ethernet and Redirect interfaces.
LANforge-ICE supports multiple virtual routers per system when LANforge is running on Linux. On Windows and Solaris, only bridge-mode is supported. Use the Netsmith tool described earlier in this guide to configure LANforge-ICE in the routed mode.
LANforge-ICE works best using a minimum of three ethernet ports: two for each WanLink and the third to access the LANforge machine remotely for management purposes. To ensure that there is no interaction with the LANforge machine's protocol stacks, the IP address for each WanLink port is automatically removed.
It is possible to run WanLinks on a machine with only two ports, but you will not have the option to manage LANforge remotely unless you cleverly configure some virtual interfaces. In this scenario, your machine will need to be configured for a loopback device to manage LANforge. See the LANforge Server Installation Documentation for how to configure a loopback device on your machine. NOTE: There are work-arounds for even this restriction if you use a more complex Netsmith setup with bridge devices. Contact support if you have such a need.
Bulk changes to WanLink Endpoints can be performed easily by selecting one or more endpoints and clicking the Batch Modify button. Selected values from the drop-down menus will be applied to all selected endpoints. Endpoint values marked 'NA' will remain unchanged.
Creating & Modifying WanLinksWhen creating a WanLink, the details of each WanLink Endpoint must be specified, including the Port where the WanLink Endpoint resides. This determines which port the WanLink will use for receiving traffic. The peer endpoint's interface will be used for transmitting packets. In order to create a WanLink, click the Create button on the WanLinks tab. WanLinks can be attached to Ethernet, Redirect, and 802.1Q VLAN interfaces. WanLinks should NOT be directly attached to MAC-VLAN, 802.11a/b/g, or PPP interfaces at this time.
WanLink Information
The top panel of the Create/Modify WanLink window contains information relating to the entire WanLink, including the name, shelf, resource, report timer, test manager, and presets. Enter a non-numeric name no more than 15 characters in length. Select the Shelf and Resource that the WanLink will reside on. For LANforge-ICE systems with only one machine, you do not need to change these values from their default of one (1).
Report Timer (ms) The report timer specifies how often the LANforge data generators send updates to the LANforge server, and how often the LANforge server pushes endpoint information up to the clients (GUIs) that have requested the automatic updates. If you are running the GUI over a slow link, or have a slower machine, it is recommended to increase the report timer to 5000ms (5 seconds) or higher. Test Manager The Test Manager specifies who 'owns' this CX, and can be used to segregate a large LANforge system for use by many engineers. For most users, however, assigning all CXs to the default_tm Test Manager is fine. CPU ID With release 5.1.4, LANforge supports one WanLink thread per CPU core. To make optimal use of multi-core systems, you can spread the WanLinks across the different CPUs. For very high-speed emulations (multiple-gigabit), you may also want to experiment with pinning Port interrupts to ensure that the packets handled by the wanlink stay 'close by' in cache. Presets The Presets function may be used to help configure common network transports (e.g., Fast DSL, DS1/T1, DS3/T3, 1G). Selecting a preset from the drop-down menu fills in some of the configuration fields in the lower two panels of the window. Configuration settings can then be modified to suit your particular needs (not all DSL networks run at the same speed, for instance). Clicking Apply or OK saves the WanLink configuration as entered in the panels (via preset selection or modified). Flags & Options Several flags (checkboxes) are used to enable or disable certain features which affect the behavior of the selected WanLink.- Coupled-Mode forces the emulation to be symmetric so you only need to configure Entry Point A. The values will be automatically set in Entry Point B when you click Apply or OK.
- Pass-Through enables the packets to pass through the emulation with minimal impairment, regardless of the other configuration. The profile must be running for it to pass any traffic, even in Pass-Through mode. Please note that there will be *some* impairment due to the overhead of passing the packets through the software/hardware.
- HW Pass-Through causes the two physical ports to be connected by physical relays when the WanLink is running, effectively making them a single wire. This takes LANforge completely out of the loop and allows full wire-speed throughput with no impairments. This mode is only supported by special NIC hardware and drivers, which may not exist on your system. NOTE: Affected ports will revert to their default Bypass settings in the Port Mgr tab when the WanLink is no longer running.
- Kernel-Mode allows for much higher emulation speeds and supports all features of the normal WAN emulation mode. Kernel-Mode is available for the WAN emulation if you are using a pre-compiled Linux kernel from the Candela downloads page.
WanLink Entry Points
The settings for each WanLink Entry Point apply to packets entering the associated Port.
Port The external ethernet interface this Entry Point resides on. Ports used in WanLinks should have their IP address, MASK, and Gateway set to 0.0.0.0 at least when the WanLink is running. LANforge will forcefully set the IP to 0.0.0.0 as soon as you start the WanLink. Jitter Frequency (Jitter-Freq) This sets the number of packets per million to have jitter randomly applied through the WanLink. Entering 10000, as an example, will apply jitter to about 1 out of every 100 packets or 1%. A percentage (0.07%, for example), can also be entered. Please see the Jitter section as well. Transfer Rate This sets how much data, in bits-per-second, will be accepted for this Entry Point. Backlog Buffer Most equipment that you will find in any network will contain a certain amount of buffers to smooth bursty traffic so that packets are not needlessly dropped. The backlog buffer is your way of configuring this value. The units are in multiples of 1024 bytes (1KB). The size of the buffer depends on many things, and should generally be larger for higher-speed simulations. Due to the bursty nature of Ethernet (and ethernet drivers in common systems), we suggest these buffer sizes when trying to simulate a relatively well structured WAN:
WanLink Speed Backlog Buffer Size 56Kbps - 256Kbps 2-8 257Kbps - 1.54Mbps 8-32 1.5Mbps - 45Mbps 32-256 45Mbps - 155Mbps 256-1024 155Mbps - 1Gbps 1024-8192 1Gbps - 10Gbps 8192-65536
Selecting AUTO will set the backlog such that it can hold at least 10 ms of data at the configured speed. It will hold more than 10ms of packets at slower speeds in order to accomodate small bursts of packets. For instance, if the rate is 10Mbps, AUTO mode will cause the backlog to be set to 62KB. The actual backlog size is shown in the WanLink Endpoints table.
Max Allowed Lateness This sets the maximum amount of extra delay that a packet can have before being dropped by LANforge on transmit. This is in addition to latency + jitter + serialization delay. In most cases it should coorespond to the Backlog Buffer, since packets queued there will be transmitted late. Using the AUTO value is usually best unless you have specific needs. AUTO max-lateness is calculated as maximum time needed to traverse the emulated network plus backlog-buffer plus 10ms. The actual lateness is shown in the WanLink Endpoints table. Delay This sets the amount of latency (in milliseconds) to be added to each packet as it enters this Entry Point. Jitter This sets the amount of random jitter (in milliseconds) to be added to each packet as it enters this Entry Point. A flat random amount of jitter between 0 and the value entered here will be applied in addition to any base delay already configured. This feature does not reorder any packets. Keep in mind that any packets directly behind a jittered packet will be delayed until the affected packet is able to be translated. For a stream with 5ms packetization, for example, a 100ms delay will affect the next 20 or so packets until the packet backlog is cleared. For this reason, you should probably not set Jitter-Freq above 20% if you are running packets through the LANforge at near its maximum emulation speed. If you are running packets at slower speeds, then it is not so important to worry about making the jitter frequency too high because it is less likely there will be a packet immediately following the jittered packet. Please see the Jitter-Frequency setting as well. Drop Frequency (Drop-Freq) How many packets out of every 1 million (1,000,000) will be purposefully dropped. This is used to simulate errors on the WAN. By default, a single packet is dropped per drop event in a random distribution. Reorder Frequency (Reorder-Freq) How many packets out of every 1 million (1,000,000) will be purposefully reordered. You can configure the min and max reorder offset in the 'Advanced' configuration screen. This is used to simulate behavior that you will see in multi-path networks and is good for testing RTP and other streaming media protocols. Duplicate Frequency (Dup-Freq) How many packets out of every 1 million (1,000,000) will be purposefully duplicated. This will cause the other side of the simulated WAN to receive two identical packets. This is used to simulate errors on the WAN. Dump Packets If selected, then all packets received will be logged to the specified directory. They can later be replayed with a LANforge-FIRE custom-ethernet connection. This allows the capture and replay of packet flows and protocols that exactly fit your environment. Each endpoint configured to dump packets should have a unique directory configured or files will be over-written. When dump packets is enabled, any existing capture files in the configured directory will be over-written. ICEcap Replay Selecting the ICEcap Replay checkbox directs the LANforge-ICE entry point connection to modify its impairment values to match those captured in the specified LANforge-ICEcap XML file. The Loop Replay, Replay Latency, Replay Loss, Replay Dup, and Replay Bandwidth checkboxes are then enabled to tailor the behavior described by the XML file. Enter a file path in the field or chose a directory and file by selecting the Dir button to the right of the field. NOTE: The ICEcap Replay feature does not directly relate to Dump Packets. Changes to the Replay settings on a running WanLink will not take effect until the WanLink is stopped and restarted. Advanced ConfigurationClicking the Advanced button on either entry point allows for the configuration of packet impairments including drop bursts of packets, modify the reordering behavior, bit & byte error corruptions, and to enforce minimum packet gaps:
Entering a value greater than 1 for Min and/or Max Drop Burst will create bursts of dropped packets. A random number of packets between Min and Max (inclusive) will be dropped for each drop event (randomly selected based on the drop-per-million on the main config screen). Min/Max Reorder Amount gives you the ability to specify how many packets will be allowed to go by before the reordered packet is re-inserted into the stream.
Selecting the Force Packet Gap checkbox will enforce a gap of at least 80% of the theoretical inter-packet gap for the configured speed between each packet. The 80% is used to allow for the LANforge system to make up for internal processing overhead, i.e. 20% of the inter-packet gap time may be needed by the LANforge system to catch up from previous (micro) delays. Enabling this feature can cause significant performance degradation at speeds of greater than about 2Mbps but results in more realistic emulations of constant-rate networks such as T1, DS3, etc.
Selecting the Drop-Xth, Reorder-Xth, or Dup-Xth checkboxes will cause packets to be dropped, reordered, or duplicated at fixed intervals as opposed to the default random distributions. Values for X are entered in the Drop-Freq, Reorder-Freq, or Dup-Freq fields of the Create/Modify WanLink window by selecting from the drop-down menu or entering a number or percentage in the field.
The QDisc field provides for a QDisc (Queue Discipline) priority to be set for the selected endpoint. First In First Out (FIFO) is the default priority. A Weighted Round-Robin (WRR) process schedule can be entered using the following format (no spaces): WRR,weight1-v1-m1...-vX-mX,...,weightX-vX-mX,...
The value-mask pairs (vX-mX) are matched to the associated queue/weightX. Higher weight is higher priority. Minimum weighting should be equal to or greater than your MTU. For example, 3 WRR queues (2000, 50000, and 20000) with match-all-bits mask of 255 for IP-TOS values of 10, 11 and 12 would look like this:
QDisc: WRR,2000-10-255,50000-11-255,20000-12-255
In this example, 10 is in the lowest priority queue and 11 is in the highest. The value-mask pair behave like the IP address and network mask pair. An incoming packet's 8-bit IP-TOS header field is compared against the value-mask pair. The packet is placed in the queue if the TOS matches the value-mask pair. NOTE: The low 2 bits of the IP-TOS header field are restricted from use.
Packet Corruptions:
LANforge-ICE supports bit and byte error corruptions in ethernet frames. The Rate field determines how often to apply the corruption (out of 1 million packets). Select the type of corruption you want to apply from the Corruption drop-down menu:
- Random Write: Will write a random byte to one byte between the min and max offset into the ethernet frame.
- Write Byte: Will write the byte specified in the Byte-to-Write field to a location between the Min and Max Offset into the ethernet frame.
- Bit-Flip: Will flip one bit from 0 to 1 or 1 to zero in a byte between the Min and Max Offset into the ethernet frame.
- Bit-Transpose: Will transpose two bits in a byte between the Min and Max Offset into the ethernet frame.
The Min and Max Offset fields determine the location of the corruption. If Min is less than Max, the corruption will be at a random byte between Min and Max.
If the Chain-to-Next checkbox is selected, any time this corruption is applied, the next corruption will be applied as well. This can allow you to reliably generate multiple corruptions in a single packet.
If the Checksum checkbox is selected, LANforge will attempt to recalculate the IPv4, UDP, and TCP checksum for the packet after applying the corruption. This will allow the errored packet to be accepted by the stacks on the receiving machine as if the data were actually valid. This feature will only work if the UDP or TCP payload does not span more than one physical ethernet frame. The ethernet checksum (FCS) is not controlled by LANforge at this time, and will always be recalculated by the network adapter on transmit.
Creating & Modifying WanPathsWanPaths represent a virtual WAN between a source and destination IP or MAC Address range. This allows you to set up one WanLink that simulates a physical pipe, and multiple WanPaths that simulate connections between different machines or sets of machines on your network. You can have up to 128 WanPaths on each WanLink endpoint.
The configuration of a WanPath is similar to that of a WanLink, except that the WanPath belongs to a specific WanLink, and you must specify the IP Address ranges (or other match criteria) that are to match this WanLink. Please note that when you add a WanPath to an endpoint, the patterns match with regard to packets entering the interface that the endpoint uses. If you want to match on a source IP of 192.1.1.2 and the endpoint is configured on eth0, then put that machine on the network connected to eth0.
Name The name of this particular WanPath. Must be unique across the parent WanLink. Pcap Filter This field is enabled by selecting the 'Use Pcap Filter' checkbox in the center of the window. Enter the Pcap filter for this WanPath using the same syntax as that of 'tcpdump'. Source IP/MAC The Source IP or MAC address that matches this WanPath. For IP address matching, the number of bits that are matched are controlled by the Source IP Mask. For MAC address matching, any non-zero mask will match exactly, and a zero mask will match all. For pcap pattern matching, this value is ignored entirely. Source Mask Specifies how many bits of the Source IP are significant. If this is 0.0.0.0 it will match anything. You can also enter an integer number between zero and 32, inclusive. For MAC addresses, 0 means 'ANY' and anything else means match exactly the single MAC. For pcap pattern matching, this value is ignored entirely. Dest IP/MAC The Destination IP or MAC that matches this WanPath. For IP address matching, the number of bits that are matched are controlled by the Source IP Mask. For MAC address matching, any non-zero mask will match exactly, and a zero mask will match all. For pcap pattern matching, this value is ignored entirely. Dest Mask Specifies how many bits of the Destination IP are significant. If this is 0.0.0.0 or 0 it will match anything. You can also enter an integer number between zero and 32, inclusive. For MAC address matching, any non-zero mask will match exactly, and a zero mask will match all. For pcap pattern matching, this value is ignored entirely. ICEcap Replay If checked, then the LANforge-ICE connection will read values from an XML file and change its values accordingly. The XML file consists of periodic samples of network characteristics. The WAN capture file can be created with scripts or third-party applications. Contact Candela for more information on how to generate these scripts. The other 'replay' related flags below pertain to this feature and determine the behavior described by the XML file. Running States If the 'Stopped' button is selected, the WanPath will not be active and all traffic will be handled as if the WanPath does not exist. Selecting 'Same as WanLink' will activate the WanPath when the WanLink is active. Inverse Match Selecting the 'Inverse Match' checkbox will reverse the match logic of the WanPath so that a 'false' pattern match is actually 'true'. Drop-, Reorder-, Dup-Xth These functions are analogous to those in the Advanced options for WanLinks. Selecting the Drop-Xth, Reorder-Xth, or Dup-Xth checkboxes will cause packets to be dropped, reordered, or duplicated at fixed intervals as opposed to the default random distributions. Values for X can be selected from the corresponding drop-down menus or entered using a number or percentage in the field.
Displaying WanLinks and WanPaths
After creating a WanLink, you may display it to watch the flow across your emulated WAN in detail. To display one or more WanLinks, select the row(s) and click the Display button.
Individual WanPaths can also be displayed by selecting one or more WanPaths and clicking the Display Selected Paths button at the bottom of the window.
Scripted WanLink
As of release 5.1.2 and later, a WanLink can be scripted via the LANforge GUI so that the user can setup a single WanLink to run with different rates, latencies, jitter and drops for various durations.
The Add/Modify Script window is divided into two panels. The top panel identifies the endpoint and defines the script type and scripting options. The bottom panel describes the script configuration.
- NONE - Deletes any existing script on the endpoint.
- RFC-2544 - Defines a default set of rates and payload sizes for a scripted Layer-3 or Armageddon endpoint.
You may use the default rates and payload sizes which are described in RFC-2544, a methodology for benchmark testing, or you can modify the default rates and payload sizes by typing in the values you want to use in the script configuration text boxes. - ScriptWL - Defines a default set of rates, latencies, jitter and drops for a scripted WanLink.
- Enable Script Whether or not to enable the use of the script on the endpoint. A script configuration can be defined for an endpoint and then disabled so that the script configuration is preserved for future use when the script is enabled again.
- Show Reports During the running of a script, this option will allow per-iteration and summary results to be generated and displayed in a pop-up text display window.
- Symmetric Symmetric allows the script configuration to apply to both endpoints associated with a connection. This would be used for a bi-directional test. With this option, the script per-iteration and summary results will include both endpoints in a single report.
- Hide Iteration Details Hides only the per-iteration results in the script report. Summary results will still be displayed.
- Hide Legend Hides only the report legend that describes the column headings in the script report.
- Hide CSV Hides only the comma seperated value data in the script report.
- Run Duration The length of time that each iteration should run. Values can be chosen from the list or typed in with one of the following suffixes:
- ms - milliseconds, s - seconds, m - minutes, h - hours, d - days.
Note:
- There is no Pause Duration for scripted WanLinks because it would mean that the WanLink is stopped which would drop all traffic. Instead, the scripted WanLink iterates over the different specified rates, latencies, jitter and drops until the completion of the script at which time the original WanLink settings are used and the WanLink is kept running.
- Rates A default set of rates is shown when the ScriptWL type is selected, but you can also enter your own set of rates that each script iteration should step through. Rates can be entered using
- or
- units. Values should be seperated by a comma or newline.
- Latencies A default set of latency values are shown when the ScriptWL type is selected, but you can also enter your own set of latency values that each script iteration should step through. Latency values can be entered in units of milliseconds and should be separated by a comma or newline.
- Jitter A default set of jitter values are shown when the ScriptWL type is selected, but you can also enter your own set of jitter values that each script iteration should step through. Jitter values can be entered in units of milliseconds and should be separated by a comma or newline.
Note:
- The frequency of the scripted jitter values will adhere to the settings on the WanLink Jitter-Freq field.
- Drops A default set of dropped packets values are shown when the ScriptWL type is selected, but you can also enter your own set of dropped packets values that each script iteration should step through. Dropped packets values can be entered in units of per-million packets or as a percentage.
-
Collision Domains (ICE)
Collision Domains complement the LANforge WAN/Network emulation feature set (LANforge-ICE) by allowing the user to associate multiple WanLinks in a group with an aggregate rate limitation. This feature is useful for emulating wireless networks where several links may allow high speeds individually, but the associated Access Point allows a fixed total throughput. For example, you could configure ten 36Mbps speed WanLinks, each with their own impairment profile, into a Collision Domain that is rate limited to 54Mbps. This would limit the group of WanLinks to no more than 36Mbps individually and 54Mbps combined, emulating the effect of having a WiFi collision domain on the network under test.
Creating & Modifying Collision DomainsAfter creating a set of WanLinks, go to the Collision-Domains tab and select Create. The WanLinks that you created will be displayed in the right-hand (Free WanLinks) column. Move the WanLinks to be associated with the Collision Domain to the left-hand (Associated WanLinks) column by selecting them and clicking the <<–– Add CX button. After the desired settings have been entered, click Apply or OK to create the Collision Domain.
NOTE: Adding Virtual Routers to a Collision Domain is not supported at this time.The top panel of the Create/Modify Collision Domain window contains information relating to the Collision Domain, including the name and report timer. You can also select the Shelf and Resource that the Collision Domain will reside on. For LANforge-ICE systems with only one machine, you do not need to change these values from their default of one (1).
Type Type specifies the Collision Domain being emulated. WIFI and several modes of WISER are the only types supported at this time. WISER is only supported when used in conjunction with third-party libraries to emulate military radios. Max-TX-BPS Specifies the aggregate rate that you want applied to all WanLinks associated with this Collision Domain. Kernel-Mode Kernel-mode for Collision Domains is not supported at this time. All WanLinks associated with the Collision Domain also must NOT be in kernel-mode.
Displaying Collision DomainsTo view the Collision Domain while it is running, go to the Collision-Domains tab.
You can also use Netsmith to view the graphical representation of your Collision Domain.
-
File Endpoints
File Endpoints are used to generate file system traffic. If you happen to configure LANforge to have file systems mounted over NFS, iSCSI, CIFS, or SMB (SAMBA), then the file system tests will indirectly produce network traffic as well. A file endpoint is synonymous with a file cross-connect, because LANforge only controls or manages a single side. The other side may be either the local file system or a remote NFS server: It makes no difference to the LANforge software suite's configuration. LANforge on Linux supports virtualization of NFS and CIFS clients, allowing one system to emulate several thousand clients. This can be useful for testing file-servers and WAN acceleration technologies.
Bulk changes to File Endpoints can be performed easily by selecting one or more endpoints and clicking the Batch Modify button. Selected values from the drop-down menus will be applied to all selected endpoints. Endpoint values marked 'NA' will remain unchanged.
Creating & Modifying File EndpointsWhen creating a File Endpoint, you get to specify attributes such as file size, how many files, read vs. write, chunk-size to read/write and some options relating to synchnonizing (flushing) the files to disk. A File Endpoint is a complete test by itself (you do not directly create File Cross-Connects as you do with some other endpoint types). In order to create a File Endpoint, click the Create button on the File-IO tab. This will bring up the Create/Modify File Endpoint window:
After the desired settings have been entered, click Apply or OK to create the Endpoint.
NOTE: A series of tests based off the current configuration can be created by clicking the Batch-Create button.File Endpoint Information
Name Enter a unique name for this File Endpoint. Report Timer Select how often (in milliseconds) the endpoint should report to the GUI. 1000-5000 (1-5 seconds) is suggested for most cases. FS-Type Select the file system type that will be used to create and verify mount points for this endpoint. Test Manager The Test Manager specifies who 'owns' this Endpoint, and can be used to segregate a large LANforge system for use by many engineers. For most users, however, assigning all Endpoints to the default_tm Test Manager is fine. Shelf, Resource, Port, Endpoint ID The shelf and resource determine which machine the test will run on. The port does not make any difference at this time, but in the future may help with directing network traffic to a particular interface. LANforge will assign a unique Endpoint-ID for display only when the endpoint is created. Min/Max-RW-Size The Min-RW-Size and Max-RW-Size specify the minimum and maximum read or write (depending on the mode) size in bytes for each call to the system read and/or write calls. Larger read/write sizes will give more throughput, smaller ones may stress the system harder in certain other ways. If the min and max are different, LANforge will randomly pick values between the min and max values entered. Min/Max File Size The Min File Size and Max File Size specify the minimum and maximum file size in bytes only when writing. When reading, LANforge will read any size file in the specified directory. Min/Max Read Rate The Min Read Rate and Max Read Rate specify how fast the Endpoint will attempt to read the file(s). If the values are not the same, LANforge will randomly pick values between the min and max rates entered. The picked value will be used for a short (random) amount of time to simulate burstiness. Min/Max Write Rate The Min Write Rate and Max Write Rate specify how fast the Endpoint will attempt to write the file(s). If the values are not the same, LANforge will randomly pick values between the min and max rates entered. The picked value will be used for a short (random) amount of time to simulate burstiness. File # Select the number of files to create when doing the write tests. LANforge will continiously write data as long as the endpoint is running and will re-use (overwrite) files as required. If you selected to use 10 files, for example, and a File Endpoint runs long enough to write 15 files, then 5 of the 10 files in your directory will have been written over once with new data. Directory Enter the location for files to be written to or read from. AUTO will use /mnt/lf/(endpoint name). When writing, if the specified directory in the field does not exist, LANforge will create it.
NOTE: The specified directory and files must exist on the LANforge resource before running a 'Read' endpoint. Since these are created by the 'Write' endpoint, it should be run first. Mount-Dir Enter the local directory to mount. If blank, 'Directory' will be used. AUTO will use the Directory field's contents. Server Enter the server IP and directory to mount.
Some examples:- NFS: 192.168.100.5/exports/vol1
- NFSv6: [2002::100:157]:/rpool/ben
- CIFS: //192.168.100.19/vg0_drbd.vol1.test01
- iSCSI: 192.168.100.19 (and configure volume: iqn.2011-04.com.openfiler:tsn.vol5)
- iSCSI with LUN: 192.168.100.19 (volume: iqn.2011-04.com.openfiler:tsn.vol5-lun-2)
NOTE: The same endpoint can easily be used to first write then read files as long as the write and read operations are conducted separately. Run the endpoint first as 'Write' until all files are written, stop the endpoint and change to 'Read', then run the endpoint as 'Read'. Quiesce Instead of stopping the File Endpoint immediately, LANforge will wait the selected number of seconds in order to finish reading or writing the next file. If the quiesce period expires before the read or write is complete, the File Endpoint is stopped. Pattern Select the data pattern to be used when writing to the disk. If you are using the check-sum feature, then there will also be a small header written to disk before the payload so we can do verification checks when reading. Selecting 'CUSTOM' enables the Custom payload field at the bottom of the window. Prefix The prefix may be used to distinguish files written for multiple endpoints. The prefix will be prepended to any file created for writing. AUTO will use the endpoint name for a prefix. Flags & Options The following flags (checkboxes) are used to enable or disable certain features which affect the behavior of the selected endpoint:- Sync-after-Write determines whether or not the fsync method will be called after every write. This really slows down performance, but may be perfect for some types of tests.
- Sync-before-Close does the fsync call right before a file is to be closed. This isn't as much of a performance killer as Sync-after-Write, but it can still slow things down. It does simulate some real world tools, such as Mail Transfer Agents (MTAs) like Sendmail.
- Use O_DIRECT allows you to open files with O_DIRECT. This tells the OS not to buffer the files, which may improve performance on writes, and will disable client-side caching for reads. This option may require read/write size to be a multiple of 512 bytes.
NOTE: This option is ignored on Windows operating systems and CIFS file system mounts on Linux. For CIFS mounts on Linux, use the 'directio' mount option to similar behaviour, for example: username=lanforge,password=lanforge,directio
- Use O_LARGEFILE allows you to open files larger than 4GB in size on a 32-bit system.
- Do-CRC allows you to tell the Endpoint to do a 32-bit CRC (checksum) on the payload and header being written to disk. If you read this with a File Endpoint that is also doing a CRC check, it will detect, with great certainty, any corruption in the file.
- Unlink may allow you to work around interoperability issues between client and server when using CIFS. Try enabling this if you get errors when over-writing files.
- Verify-Mount directs LANforge to attempt to verify that the file system is properly associated with the selected port.
- Auto-Mount directs LANforge to attempt to mount the specified server on the local directory.
- Un-Mount directs LANforge to attempt to unmount the directory when stopping the test.
Batch-Create File Endpoints
A series of tests can be created based on the Name and other current settings in the Create/Modify File Endpoint window by using the Batch-Create function. For best results, create a valid endpoint for the first in the series to be batch-created, select the endpoint and click Modify. Clicking the Batch-Create button at the bottom of the window will pop up the File-IO Batch Creator:
After the desired settings have been entered, click Apply or OK to create the series (batch) of File Endpoints.
Quantity The number of File Endpoints to batch-create, using the selected endpoint for the initial values. Number of Digits The number of characters (padding) to be used in appending each endpoint name. Adds leading zeros (zero-pads) to endpoint names as required (this may help with sorting connections). For best results, this number should match the format of the selected endpoint (Ex: 4 for an initial endpoint named File-0001). Zero Padding Checkbox Uncheck the 'Zero Padding' checkbox if you do not desire leading zeros for the endpoint names when they are created. Starting Name Suffix The first number in the series (Ex: 0001 for File-0001) from which subsequent endpoints will be incremented. If the original endpoint name ends in a number or series of numbers, it will be displayed here. Name Increment Endpoint Names in the batch will be incremented by this amount. If set to 2, the next connections following cx-0001 would be cx-0003, cx-0005, etc. Port Increment A Ports used for each endpoint will be incremented by this amount. If set to 2, then eth2 would be incremented to eth4, eth6, etc. Directory Increment The local directory set in the Directory field will be incremented by this amount if not set to AUTO. If set to 2, then /mnt/lf/foo0001 would be incremented to /mnt/lf/foo0003. Mount-Dir Increment The mount directory will be incremented by this amount if the Mount-Dir field is not set to AUTO. If set to 2, then /mnt/lf/foo0001 would be incremented to /mnt/lf/foo0003. Prefix Increment The endpoint prefix will be incremented by this amount if the Prefix field is not set to AUTO. If set to 2, then lf0001 would be incremented to lf0003. Volume Increment The iSCSI volume will be incremented by this amount if the iSCSI-Volume field is not blank. If set to 2, then iqn.2009-2.com.lanforge:for.all.0 would be incremented to iqn.2009-2.com.lanforge:for.all.2
NOTE: Volume names are NOT zero-padded by the batch-creator. -
Layer 4-7 Endpoints (FTP, HTTP, etc.)
You can now create endpoints with these protocols: HTTP, HTTPS, FTP, FTPS, TFTP, SMTP, SMTPS, POP3, POP3S, IMAP, IMAPS, SCP and SFTP. These are stateful protocols that will communicate properly with third-party servers. FTP, FTPS, TFTP, SCP and SFTP can upload and download, SMTP is upload-only, and the other protocols are only for downloading. The Layer-4 tab is used to manage Layer 4-7 endpoints.
Creating & Modifying Layer 4-7 EndpointsTo Create a new Layer 4-7 endpoint, click on the Create button. This will bring up the Create/Modify L4 Endpoint window. To modify a layer 4-7 endpoint, select the endpoint(s) and click the Modify button. You will see a window that looks like this:
After the desired settings have been entered, click Apply or OK to create the Endpoint.
NOTE: A series of tests based off the current configuration can be created by clicking the Batch-Create button.L4 Endpoint Information
Name The Name specifies the name of this Endpoint, and must be unique across the LANforge system. Report Timer The Report timer specifies how often the Endpoint voluntarily reports data (you can query it at any time). Test Manager The Test Manager specifies who 'owns' this Endoint, and can be used to segregate a large LANforge system for use by many engineers. For most users, however, assigning all Endpoints to the default_tm Test Manager is fine. Shelf, Resource, Port The Shelf and Resource specify which machine this Endpoint will operate on, and the Port specifies which port will be used for outgoing traffic. It will usually dictate the port for incomming traffic too, but LANforge cannot strictly enforce that if you are using a non-LANforge system to serve up the Layer 4-7 data. Endpoint Name The Endpoint Name is just the unique identifier for this endpoint, and may not be modified by the user. URLs per 10m The "URLs per 10m" field specifies the number of URLs that the endpoint will process in a 10-minute period. This is where you set your rate limiting. Max Speed Max Speed configures a maximum download or upload rate for the endpoint. You may select a preset value or enter a custom value by typing in the field. Quiesce Setting the Quiesce value to N seconds tells LANforge to wait to receive packets for N seconds before stopping the test if the Quiesce button is used to stop the test. This is useful if the network under test has high latency. URL Timeout !!!!!!!!!!!!!!!!!!!!!! DUNNO WHICH cURL SETTING - MOUSEOVER IS USELESS TOO !!!!!!!!!!!!!!!!!!!!!!. DNS Cache Timeout This setting is how long to cache a DNS lookup in seconds. If set to zero then there is no caching of DNS entries and a lookup will be performed on every URL request. TFTP Block Size The block size, in bytes, of a TFTP transfer can be set to support RFC 2348. Proxy Port, Proxy Server The Proxy Port and Proxy Server relates to HTTP proxies, and will be filled in according to your network setup if you choose to use this feature. Proxy Auth, Proxy Auth Types If your proxy requires authentication, enter the user password in the 'Proxy Auth' input field. The proxy authentication types are:- Basic: Sends username and password in plain text over the network.
- Digest: Described in RFC 2617, does not send the plain text password over the network.
- NTLM: NT LAN Manager is a proprietary Microsoft 'challenge/response' protocol.
- Basic: Sends username and password in plain text over the network.
- Digest: Described in RFC 2617, does not send the plain text password over the network.
- GSS-Negotiate: Described in IETF draft-brezak-spnego-http-04.txt, a Microsoft implementation of SPNEGO and GSSAPI authentication mechanisms.
- NTLM: NT LAN Manager is a proprietary Microsoft 'challenge/response' protocol.
<This email address is being protected from spambots. You need JavaScript enabled to view it. ><This email address is being protected from spambots. You need JavaScript enabled to view it. >..<This email address is being protected from spambots. You need JavaScript enabled to view it. >UL/DL UL/DL specifies whether you are uploading to or downloading from the URL, respectively. Select 'Download' for HTTP URLs to avoid undesired results. Select either 'Upload' or 'Download' for FTP URLs, but make sure your FTP server is configured to allow the anonymous login to do what you are requesting. Quiesce Instead of stopping the L4 endpoint immediately, LANforge will wait the selected number of seconds in order to finish downloading or uploading the next URL. URL The URL specifies the thing you are downloading from, or uploading to. Here is an example URL for an Upload:- ftp://172.1.1.103/pub/upload/gnuserver.upload
Some URLs include:
- Upload/Download a file with FTP, using anonymous login:
ftp://172.1.1.103/pub/gnuserver - Upload/Download a file with FTP using user/password to login:
ftp://user:This email address is being protected from spambots. You need JavaScript enabled to view it. :8021/README - Upload/Download a file with TFTP login:
tftp://192.168.100.6/bthelper - Download a file with HTTP:
http://172.1.1.103/index.html - Download a file with HTTPS:
https://172.1.1.103/index.html - Download a specific email id with IMAP:
imap://user:This email address is being protected from spambots. You need JavaScript enabled to view it. /INBOX/;uid=1 - Download all email for this user with IMAP:
imap://user:This email address is being protected from spambots. You need JavaScript enabled to view it. / - Download all email in INBOX for this user with IMAP:
imap://user:This email address is being protected from spambots. You need JavaScript enabled to view it. /INBOX?ALL - Download all email in INBOX with POP3:
pop3://user:This email address is being protected from spambots. You need JavaScript enabled to view it. / - Upload/Download a file with scp:
scp://user:This email address is being protected from spambots. You need JavaScript enabled to view it. .3//home/user/10M.file-dl - Upload/Download a file with sftp:
sftp://user:This email address is being protected from spambots. You need JavaScript enabled to view it. .3//home/user/10M.file-ul - Send email with SSL security using SMTP:
smtps://user:This email address is being protected from spambots. You need JavaScript enabled to view it. - Send email with SSL security using SMTP, use script to generate random email text:
Select 'Get-URLs-From-File'
specify file in URL textbox: smtp_urls.txt
The file should have contents similar to:
system 'update_email_txt.pl > /tmp/smtp_script_mail.txt' ul smtps://user:
This email address is being protected from spambots. You need JavaScript enabled to view it. /tmp/smtp_script_mail.txt - Send/Receive Telnet protocol, use script with expect logic:
Select 'Get-URLs-From-File'
specify file in URL textbox: telnet_urls.txt
The file should have contents similar to:
log Starting telnet session dl telnet://192.168.100.6 /tmp/fs2-telnet.txt expect login: user expect Password: password expect ]$ ls expect ]$ exit done log Done with telnet session.
Another option is to have a list of URLs in a file on the LANforge data generator machine. In that case, you specify that filename (relative to /home/lanforge) and the Layer 4-7 Endpoint will process every URL in that file, over and over again. A file might look like:
# Format is: # [ul | dl] 'URL' 'filename' # Get default web page from lf1 dl http://172.1.1.103/index.html /tmp/172.1.1.103_index.html # Get default web page from lf4 dl http://172.1.1.103/index.html /tmp/172.1.1.103_index.html # Get a file via FTP dl ftp://172.1.1.103/pub/gnuserver /tmp/172.1.1.103_gnuserver # Put a file via FTP ul ftp://172.1.1.103/pub/upload/gnuserver.upload /tmp/172.1.1.103_gnuserver # Log a message to LANforge logs log This is the message that will show up in the logs. # Sleep for one second (1000 ms) sleep 1000 # expect [input] [output] Only works with Telnet currently. expect login: user # Done with telnet connection. done # Call a system command (Used to generate a new email text in this case) # The environment variable LFL4_SYSCNT will be set to the number of times # the system call as been executed while processing this script. system 'update_email_txt.pl > /tmp/smtp_script_mail.txt' # Set some values in the Layer-4 Endpoint set smtp_from
File The File specifies where you will save the downloaded URL, or what you will upload to the URL if you are uploading. Be careful not to over-write any useful files! LANforge runs as root, and will happily overwrite any file you specify! We suggest you always use files in the /tmp directory for safety.Flags & Options The following flags (checkboxes) are used to enable or disable certain features which affect the behavior of the selected endpoint.This email address is being protected from spambots. You need JavaScript enabled to view it. set rctp_to <This email address is being protected from spambots. You need JavaScript enabled to view it. ><This email address is being protected from spambots. You need JavaScript enabled to view it. >- Get-URLs-From-File tells the endpoint to treat the URL as a file on the local machine. Note that you do not (at this time) put any URL protocol on the filename. In other words, use /tmp/foo.txt, and not file://tmp/foo.txt.
- Authenticate Server should be checked if you are using SSL (HTTPS) and want to verify the server. Do not select this checkbox if your server is not authenticated.
- Use-Proxy enables the use of HTTP proxy settings.
- Allow-Reuse allows LANforge to reuse existing connections when possible. When not selected, LANforge will create a new connection for each requested URL.
- Allow-Cache allows LANforge to use cached objects from servers.
- Enable 4XX enables 4XX error reporting, counting all HTTP error codes 400 and above. When enabled, any HTML data associated with this response code will be ignored. When disabled, no error will be reported for error codes 400 and above and HTML content will be downloaded as normal.
- Show-Headers downloads/shows headers as appropriate. For example, this allows email headers to be downloaded when using IMAP.
Batch-Create Layer 4-7 Endpoints
A series of tests can be created based on the Name and other current settings in the Create/Modify L4Endpoint window by using the Batch-Create function. For best results, create a valid endpoint for the first in the series to be batch-created, select the endpoint and click Modify. Clicking the Batch-Create button at the bottom of the window will pop up the Layer-4 Batch Creator:
After the desired settings have been entered, click Apply or OK to create the series (batch) of Layer-4 Endpoints.
Quantity The number of Layer-4 Endpoints to batch-create, using the selected endpoint for the initial values. Number of Digits The number of characters (padding) to be used in appending each endpoint name. Adds leading zeros (zero-pads) to endpoint names as required (this may help with sorting connections). For best results, this number should match the format of the selected endpoint (Ex: 3 for an initial endpoint named L4test100). Zero Padding Checkbox Uncheck the 'Zero Padding' checkbox if you do not desire leading zeros for the endpoint names when they are created. Starting Name Suffix The first number in the series (Ex: 100 for L4test100) from which subsequent endpoints will be incremented. If the original endpoint name ends in a number or series of numbers, it will be displayed here. Name Increment Endpoint Names in the batch will be incremented by this amount. If set to 2, the next connections following cx-101 would be cx-103, cx-105, etc. Port Increment A Ports used for each endpoint will be incremented by this amount. If set to 2, then eth2 would be incremented to eth4, eth6, etc. File Increment Files (for saving) will be incremented by this amount.
Layer-4 Endpoint DisplayIndividual Layer-4 connections can be selected for display from the Layer-4 tab. Select a connection and click the Display button to bring up a summary window for that connection.
The graphs on the right side of the Layer-4 Endpoint display window show the latency distributions for various measured parameters in milliseconds. The top left graph shows the latency distribution of the time it took to receive the first byte of data from the server. The top right graph displays the distribution of the time it took to complete the URL request from beginning to end. And the bottom left graph indicated the latency distibution for DNS lookups.
LANforge only counts the latencies when it receives the packet. This is not exactly the time that the packet was received by the LANforge hardware because the packet must flow through the protocol stacks up to the LANforge server. This is the primary cause of the range of latencies you will see reported even on a simple and fast LAN. The average is usually very close though: It is a running average of the last 100 URLs received.
The upper right portion of each display widget lists the average latency (in milliseconds), width, and min/max latency within the respective time period. The color-coded numbers on the upper left of each widget are counters for each latency 'bucket' and are represented by the vertical bar graph below it.
The units for the size of the buckets are milliseconds, and are logarithmic (2^X) in scale. The exponential values (1, 2, 4, 8, etc.) will be multiplied by the bucket 'width' (currently always 1), and added to the minimum latency. For instance, if the minimum latency is 30 milliseconds, then the range of the first several buckets for each will be:
31: 32: 34: 38: 46: ...
Assuming the minimum is 30, if the bucket "1" has 2000 beside it, then that means that 2000 URLs have been received in the last time-period that had less than 31 milliseconds latency. If the bucket "2" has 30 beside it, then that means 30 packets had latency between 31 and 32 milliseconds.
The minimum latency can change over time, which will cause the buckets to shift their values. Although this may be confusing at first, it allows LANforge to report high-precision data regardless of the latency of the system under test.
When viewing the Spreadsheet output, the lat_0, lat_1, etc columns show the number of packets received in the last time period that fall into the buckets.
-
Generic (User) Endpoints (ping, traceroute, etc.)
LANforge has the ability to control command line tools and collect their results. For example, the 'ping -I eth4 172.1.1.2 -s 1024' command will ping to host 172.1.1.2, using the local interface eth4. The command must not redirect standard-out, or LANforge may not be able to properly stop the test. It is up to the user to specify the correct command line, but Candela Technologies will be happy to offer suggestions and help with any tools you would like to use in this manner.
Creating & Modifying Generic EndpointsTo Create a new Generic endpoint, click on the Create button on the Generic tab. To modify, select the Endpoint(s) and click the Modify button. You will see a window that looks like this:
Name The Name specifies the name of this Endpoint, and must be unique across the LANforge system. Report Timer The Report timer specifies how often the Endpoint voluntarily reports data (you can query it at any time). Test Manager The Test Manager specifies who 'owns' this Endpoint, and can be used to segregate a large LANforge system for use by many engineers. For most users, however, assigning all Endpoints to the default_tm Test Manager is fine. Shelf, Resource, Port The Shelf and Resource specify which LANforge data generator the command will be run on. The Port specifies which interface the traffic should go on, but at this time, LANforge does not enforce that the command-line is correct. The user must specify the correct command line arguments to whatever command is being used. Endpoint Name The Endpoint Name is the unique identifier for this endpoint, and may not be modified by the user. Command Builders The Command is the command that will be run on the specified machine. It should be identical to what you would have to type if you were to telnet into that machine and run the command. Other commands/tools you might find useful:
PING (ICMP) You can use the standard ping program, but you may also want to consider the lfping script included with LANforge. It wraps the ping program and offers better reporting.
lfping -I eth1 -s 1024 192.168.1.100Traceroute (ICMP) Traceroute is a tool that is used to show each packet hop (router) for a path through a network. It utilizes ICMP response codes to determine the path.
traceroute www.slashdot.orgDNS DNS is the protocol that programs use to resolve domain names into IP addresses and vice versa. We provide a modified version of the standard unix 'dig' tool for generating DNS traffic:
./dig -b <local-ip> -B <local-iface> [@<nameserver.com>] <domain> SMTP SMTP is the Simple Mail Transfer Protocol, which handles the vast bulk of email on the internet. We provide the smtp-client.pl program which is a simple client script that can talk to a third-party mail server, such as sendmail. You can get some additional help on the tool by running the command: ./smtp-client.pl --help from the Linux prompt on the lanforge machine. The text file to be sent as email can have headers, for instance:
Subject: Test Email
This is a test email.
./smtp-client.pl --enable-auth --verbose --user <user-name> --host <mail-server-name-or-ip> --local-host <local-ip> --local-iface <local-iface> --to <This email address is being protected from spambots. You need JavaScript enabled to view it. > --from <This email address is being protected from spambots. You need JavaScript enabled to view it. > --pass <mail-server-password> --data <text-file-to-email>TELNET Telnet requires user-interaction, so we utilize an expect script. Please examine the telnet_expect_wrapper.pl and telnet.expect scripts. You will also need to use the modified 'telnet' executable that comes with LANforge. Netcat, Nmap Scripts to generate random netcat and Nmap traffic have been donated by Daniel Berry. You will need to edit the script slightly to match your network configuration. Please see the rand_nc.pl and rand_nmap.pl scripts for details. -
Resources (Data Generator Machines)
The LANforge system uses the term 'Resource' to apply to a data-processing machine. The Resource Mgr tab displays information on all Resources discovered by the LANforge server and provides the the ability to perform system functions on selected machines (one or more). Clicking the Netsmith button will open a Netsmith display window for the selected Resource(s). Clicking the Restart LANforge button will restart the LANforge server on the selected Resource(s). Clicking the Reboot Machines button will reboot the operating system on selected Resource(s). Clicking the Shutdown Machines button will shutdown the operating system on the selected Resource(s).
If a resource indicates 'Phantom', then the LANforge server is not running on it, or the LANforge manager is unable to communicate with it for some reason. You will not be able to manage a Resource in this state. If the Resource is not Phantom, then you can also reboot the Resource OS, or shutdown the OS for good (i.e., until a power-cycle of the individual Resource.)
If you have LANforge systems in a geographically disperse deployment, you may wish to connect them to a GPS device to automatically obtain their location. LANforge supports this feature, and all you need to do is configure the right serial port settings using the lfconfig tool. You may also manually enter the coordinates using the CLI.
If you DO wish to power down a Resource completely (i.e. remove power), then you should ALWAYS choose to shutdown the Resource first, and give it about 1 minute to take itself down gracefully.
NOTE: Shutting down a machine will destroy any test that is using that machine. The operating system may not come back up until a power-cycle is performed. -
Serial Spans
The Serial Spans tab is used to manage T1 and E1 spans and channel groups. T3 and other higher speed interfaces may be supported in the future. Currently, Digium T1 cards and Sangoma T1 and E1 cards are supported.
Creating & Modifying Serial SpansLANforge cannot currently detect the T1/E1 spans automatically, so you must add them through the GUI if your system is not pre-configured. Click the Create button in the Serial Spans (T1) panel of the Serial Spans tab. This will bring up the Create/Modify Serial Span window:
Span-Number This number must be unique on each Resource. This number is used to configure Digium cards, so if you have a system with both Digium and Sangoma T1 adapters, you should configure the Digium interfaces with IDs starting with 1. Shelf The virtual shelf for the LANforge machine that will hold the T1 interface. Resource The LANforge machine that will hold the T1 interface. Span Type The type of hardware for this span. Sangoma-T1 and Sangoma-E1 are the only valid choices at this time. First Channel This is used to configure the Digium adapters. For T1 interfaces, the first channel can be calculated with this formula: span-number * 24 + 1 Timing This influences how the T1 interface derives its timing. The correct setting depends on the settings of the device terminating the span. If the peer is MASTER, then set LANforge to Normal, and vice versa. Buildout Choose the setting closest to the actual length of the T1 span this interface will be attached to. Framing The framing for this T1 interface. ESF is a good choice if you are uncertain and are using T1 NICs. D4 is also supported by Sangoma NICs. Coding The encoding protocol for this T1 interface. b8zs is a good T1 choice if you are uncertain. AMI is also supported by Sangoma. PCI-Bus This is needed for Sangoma T1 cards only. You can find the PCI bus by looking at the output of wanrouter hwprobePCI-Slot This is needed for Sangoma T1 cards only. You can find the PCI slot by looking at the output of wanrouter hwprobeCPU-ID This is needed for Sangoma T1 cards only. For a 2-port NIC, one interface will be 'A' and the other will be 'B'. MTU This specifies the MTU for the in-band management. This can be left at the default of 1488 and does not affect LANforge behavior.
Creating & Modifying Channel GroupsAfter creating a Serial Span, you can now configure one or more channel groups on the span. Digium T1 cards support up to 24 channel groups per span, but the Sangoma cards we have tested only support 1 channel group at this time. Click the Create button on the Channel Groups panel of the Serial Spans tab. This will bring up the Create/Modify Channel Group window:
Name The name for the channel group should be unique to the specified resource and no more than 15 characters in length. Shelf The virtual shelf for the LANforge machine that will hold the channel group. Resource The LANforge machine that will hold the channel group. Span The Span number that this channel group will reside upon. Channel Group Type Specifies the encoding for this channel group. Select 'clear' for PPP channel groups. Channels Specifies the particular channels to use for this channel group. Examples of possible entries include: "ALL", "0-23", "0-4,7,9,20-23", and "1,2,3,4,5,6". MTU This specifies the MTU for this channel group. If your machine is being over-worked and/or dropping packets, try increasing the MTU. For PPP links, the MTU is not critical, and should be set to a larger value, like 1488 or 1500. Idle Flag This specifies the idle flag for this channel group. This byte pattern will be sent automatically by the T1 hardware whenever there is nothing else to send. This value should probably match the idle flag used by the peer equipment to which LANforge is attached. -
Creating & Modifying PPP Interfaces
The PPP connections will run over one or more T1 channel groups, and PPPoE interfaces can be created over regular ethernet (assuming you have a PPPoE server available). If you choose more than one channel group, then the multi-link PPP protocol will be used.
The basic building block of the ppp daemon is the pppd server. If you only use Sangoma T1 hardware or PPPoE, the default pppd on modern distributions will work. LANforge creates a start script in the pppScripts directory. When the PPP link is started, LANforge will fork and exec this script.
To create a PPP connection, click Create from the PPP-Links tab. This will bring up the Create/Modify PPP-Link window:
Unit-Number Should be unique for a particular resource. This will be the XXX in the device name pppXXX. For instance, if the interface should be called ppp2, then set the Unit-Number to 2. Shelf The virtual shelf for the LANforge machine that will hold the PPP Link Resource The LANforge machine that will hold the PPP Link MLPPP-Desriptor If using Multi-Link PPP, then set the descriptor here. It should start with magic: and then be followed by asci-hex. For example: magic:01:02:ab:df The identifier should be unique for each PPP-Link on a particular machine. Local-IP Specify the Local-IP for this PPP Interface. Not needed for PPPoE. Remote-IP Specify the Remote-IP for this PPP Interface. When connecting two PPP links to each other, the Local & Remote IP addresses should be swapped. Not needed for PPPoE. LCP-Echo-Interval Specifies, how often (in seconds) a Link Control Protocol echo should be sent. LCP-Echo-Failure Specifies how many echo failures we can have before we consider the link to be down. Holdoff How long (in seconds) to wait before trying to reestablish a PPP link that has gone down for some reason. Flags & Options The following flags (checkboxes) are used to enable or disable certain features which affect the behavior of the selected endpoint. - Debug will run the ppp daemon in debugging mode. The log files will be placed in the pppLogs directory.
- Auth should be selected if you want to authenticate this PPP connection. Auth is not supported at this point, so leave this un-selected.
- Persist will cause LANforge to attempt to reestablish the PPP link if the link goes down for some reason. In most cases, this option should be selected.
-
Ports (Interfaces)
The Port Mgr tab represents the individual Ethernet Ports and other virtual interfaces on the LANforge Data Generators (Resources). It has a large number of counters whose values are acquired from the kernel drivers. Each port can be configured with an IP address (and must be configured if you are running anything other than raw Ethernet protocols or LANforge-ICE) and a default gateway. The Default Gateway will be used when the system-under-test acts as a router. LANforge is designed to make each port look as if it's a separate computer, so you are able to specify a different default gateway on each port, or the same one if you desire. You are not restricted to the use of Port IP addresses, except that you must not have duplicate IP addresses on the same Resource, and of course they must make sense in whatever testing network you have configured. TCP/IP networking can be complex, so if you have questions not addressed here, email
This email address is being protected from spambots. You need JavaScript enabled to view it. and they will explain how LANforge can address your specific needs.LANforge can also give you easy access to some ethernet driver configuration options, including various link speeds and auto-negotiation settings. This, of course, will only work if you have the cards and ethernet drivers which support these features.
The buttons on the top panel of the Port Mgr tab are used to view and manage individual ports.
Clear Counters Clears the counters for the selected ports. Reset Port Clicking Reset Port tells the driver to drop the ethernet link of the selected port. It will then read the TCP/IP configuration information from a file that was generated when you configured (Modified) the Port, and rebuild all of the TCP/IP information, including the default gateway, IP address, and subnet-mask. View Details Clicking View Details opens the Current Settings window which displays a read-only view of the selected port. This will be automatically updated as information is received from the server. It is useful to have one of these windows open while configuring a port as it allows you to see exactly what the server is reporting at any given time. Batch Modify Bulk changes to ports can be performed easily by selecting one or more ports and clicking the Batch Modify button. Selected values from the drop-down menus will be applied to all selected ports. Port values marked 'NA' will remain unchanged.
Viewing & Modifying PortsTo modify a port configuration, select the port and click the Modify button. This will bring up the Configure Settings window for the selected port:
The upper panel displays Port Status Information as currently reported by the ethernet drivers. Port status will be updated automatically, but can also be updated by clicking the Refresh button on the LANforge Manager window.
NOTE: With Bypass hardware installed, the 'Current:' line will include one of the following states: BYPASS-ENABLED, BYPASS-ENABLED BYPASS-SLAVE, BYPASS-DISABLED, or BYPASS-DISABLED BYPASS-SLAVE.The lower panel displays Port Configurables. Selecting the checkboxes to the left allows data to be entered or modified in the General Interface Settings, Port Rates, and Advertise Rates sections.
NOTE: The 'Set Bypass' checkbox, which allows for setting the Watchdog timer and other Bypass functions, will only be enabled if hardware support for the bypass feature set is detected.- Set IP Info is selected by default and provides for modification to the DHCP-IPv4 checkbox and other IP address information.
DHCP-IPv4 Selecting this checkbox sets the interface to be a DHCP-IPv4 client and disables the other IPv4 fields. The interface will attempt to acquire an address after the change is applied. To setup an interface as a DHCP server, see the Netsmith section of this guide.
Secondary-IPs Click this button to create/delete/modify the Secondary IPv4 Addresses for this interface.
The left text box displays the current secondary IPs that currently exist, and the right is the current configuration. To change the secondary IPs, modify the right-hand side appropriately and press Apply.
The syntax is: IP[-MaxIP]/prefix IP2[-MaxIP2]/prefix ...
Example: 1.1.1.1-1.1.2.254/16 2.3.4.5/24 4.5.6.7/16DHCP Client ID: Allows you to specify the DHCP client ID for DHCP requests. This is only used if DHCP is enabled. Leave blank to not use this feature.
IP Address: Allows you to change the IP address on the interface.
IP Mask: Allows you to change the IP Mask for the interface.
Gateway IP: Allows you to change the default gateway for packets leaving from this interface.
- Set IP6 Info is selected by default and provides for modification to the IPv6 address information fields.
IPv6 Address fields allow you to change the IPv6 address information for the Global, Link-Local and Default Gateway. AUTO is the perferred method for configuring link-local addresses.
- Set Alias enables the Alias field.
Alias: Allows the user to specify a nickname for this interface.
- Set MAC enables the MAC Addr field.
MAC Addr: Allows you to change the MAC address of the interface.
- Set TX Q Len enables the TX Q Len field.
TX Q Len Allows you to change the Transmit Queue Length (in packets) for this interface's driver. A good range is between 100 and 2000, and you should be towards the higher end for ports expected to run at higher speed.
- Set MTU enables the MTU field.
MTU: Allows you to change the Maximum Transmission Unit (MTU) for this interface. You should understand the implications before changing this. Default is 1500 for most devices. Many Gigabit Ethernet systems can handle 8k or larger MTU settings, yielding increased throughput in some scenarios.
- Set Rate Info enables the buttons in the Port Rates panel, checkboxes in the Advertised Rates panel, as well as the Renegotiate and Restart Xcvr checkboxes.
Port Rates Allows you to change the rates on the ethernet driver. NOTE: The 'Autonegotiate' mode is most flexible and should be used for normal operations, including when using copper 1000Mbps NICs. The selectable buttons can be used to set a fixed speed. This may work around bugs in your driver or in the device under test, but make sure the same speed is set on both ends of the connection!
Renegotiate Selecting this checkbox allows you to force the interface to renegotiate the link speed. This may fix a hung driver, but don't count on it!
Restart Xcvr Selecting this checkbox allows you to restart the ethernet transceiver. This may fix a hung driver, but don't count on it!
- Set PROMISC enables the PROMISC checkbox.
PROMISC Selecting this checkbox allows you to put the adapter into promiscuous (accept all frames) mode. WiFi radio devices should always be in PROMISC mode.
- Set RX-All enables the RX-ALL checkbox.
RX-ALL Certain drivers (e100, e1000) have been modified by Candela to allow them to receive packets with bad CRCs and other errors. This allows you to use a packet sniffer like Wireshark to diagnose packets with errors. This option also includes the 4-byte CRC at the end of the ethernet frame in packets received from the network. This will aid debugging of bad CRC values, but it will break certain applications (such as LANforge-ICE, currently).
- Set Bypass enables the Bypass-related checkboxes and the Watchdog drop-down menu (Bypass hardware required). See below for more details on Bypass hardware features.
- Set Rpt Timer enables the Rpt Timer drop-down menu.
Rpt Timer: Allows you to specify how often this interface should report back to the LF Manager/GUI. Value is in milliseconds.
- Set Bridge Info enables the Br Cost and Priority drop-down menus.
Br Cost: Allows you to change the bridge port cost (lower cost is 'better').
Priority: Allows you to change the bridge port priority (lower value means higher priority).
The buttons located at the bottom of the window provide additional functionality in addition to the standard Apply, OK, and Cancel.
View Details This function is exactly the same as selecting View Details on the Port Mgr tab. Probe Probes the low level information for this port. Sync Synchronizes self with the current database as reported by the server.LANforge supports virtual WiFi stations (Virtual STA) interfaces when LANforge is used with supported WiFi NICs. Currently, only certain Atheros 802.11a/b/g and 802.11a/b/g/n NICs are supported.
ESSID The correct ESSID allows a Virtual STA to associate with an AP with the same ESSID. Diversity The Atheros a/b/g (ath4k) supports configuring antenna diversity. Key/Phrase Enter the WEP 64 or 128-bit key here. For ASCII strings, prepend 's:' to the front of the key, e.g. s:wgU]+'j!eZlLI For HEX keys, enter the key in ASCII HEX, for instance: 7767555d2b276a21655a6c4c49 For WPA, enter the pass-phrase in this field. AP (Virtual STA devices only) Specify the station ID of the AP with which you wish this Virtual STA to associate. The station ID looks like an ethernet MAC address. To associate with any available AP, set this to DEFAULT. Mode Specify the Radio mode (A/B/G/N or a combination). Each station can use any mode, but the radio can only be on a single frequency. So, you can have a combination of A, G, and N devices on a 5Ghz channel, or B, G, and N on a 2.4Ghz channel. Country (Radio devices only) Specify the country code for the radio. This cannot over-ride the country code in the NIC itself. If that needs to be over-ridden, contact support for directions on adding the proper kernel module. Frequency This is a read-only value, reporting the current frequency. Channel This only applies to APs. For stations, the supplicant process will scan all available channels to find an AP that matches the configured constraints (essid, encryption type, AP MAC, etc). Sensitivity (Radio devices only) Specify the sensitivity for the radio. See manual page for 'iwconfig' or contact Candela for more details. Rate Specify the rate at which the radio should function. Use one of the options in the pull-down menu. Leave at 'OS Default' for best possible rate. RTS (Radio devices only) Specify the RTS threshold. See manual page for 'iwconfig' or contact Candela for more details. Tx Power (Radio devices only) Specify the transmit power for the radio. See manual page for 'iwconfig' or contact Candela for more details. AMPDU-Factor Specify the AMPDU-Factor. This value can only be decreased from what the hardware supports. For 802.11a/b/g/n ath9k NICs, all values are supported. AMPDU-Density Specify the AMPDU-Density. This value can only be increased from what the hardware supports. For 802.11a/b/g/n ath9k NICs, only 8 and 16us is supported currently. Max-AMSDU Specify the Max-AMSDU. This value can only be decreased from what the hardware supports, and unfortunately, the 802.11a/b/g/n ath9k NIC only supports the minimum value of 3839 bytes currently. Bridge-IP When using Virtual Stations in a WiFi bridge, the bridging can be based on the MAC of the station or you can specify an IP address in this field. When using IP address bridging, only ARP and IP protocols are supported. Contact support if you need additional protocol support. Use WPA Specify whether the virtual station will use WPA. The pass-phrase must be entered in the Key/Phrase field. Use WPA2 Specify whether the virtual station will use WPA2. The pass-phrase must be entered in the Key/Phrase field. Use WEP Specify whether the virtual station will use WEP. The WEP Key must be entered in the Key/Phrase field. Disable HT40 If selected, HT40 (40Mhz channel width in 802.11n) will be disabled even if the AP and station otherwise support it. Use Supplicant Specify whether the virtual station will be managed by the wpa_supplicant process. Always select this unless you are certain of what you are doing. Custom WPA Cfg (Virtual STA devices only) Specify a WPA supplicant config file instead of using an auto-generated one. Use 80211D Enable broadcast of 802.11D country codes. Only used in Virtual APs. Short Preamble Enable short-preamble. Only used in Virtual APs. WPA Cfg (Virtual STA devices only) Specify the location of the custom WPA supplicant config file. For instance, if you want to use MSCHAPv2 (aka WPA Enterprise), you could use a custom config file similar to:crtl_interface=/var/run/wpa_supplicant fast_reauth=1 network=( ssid="foo" key_mgmt=WPA-EAP eap=PEAP identity="user" password="user-password" phase1="auth=MSCHAPV2" priority=10 )
Hardware Bypass Modules
Certain hardware supports port pairs physically looped together in a 'master-slave' configuration to be set in Bypass Mode, creating a single logical wire. With bypass hardware installed, the state of each module will be listed on the 'Current:' line of the Port Status Information pane for that port:
- BYPASS-ENABLED
This status will be set on the 'master' port of a Bypass Pair when the 'Bypass' checkbox is selected. This port and its 'slave' peer are in bypass mode.
NOTE: When a Bypass Pair is in Bypass-Enabled state, only the master port LED on the NIC will indicate link status and LANforge will not show link status on the Status tab. When a port pair is in bypass mode, it acts as a single physical cable. - BYPASS-ENABLED BYPASS-SLAVE
This status will be set on the 'slave' port of a Bypass Pair when the Master port is in the bypass mode.
- BYPASS-DISABLED
This status will be set on the 'master' port of a Bypass Pair when the 'Bypass' checkbox is not selected. This port and its 'slave' peer are in normal mode.
- BYPASS-DISABLED BYPASS-SLAVE
This status will be set on the 'slave' port of a Bypass Pair when the Master port is in the normal mode.
Bypass hardware can be configured via the Port Mgr tab or manually enabled via a running WanLink connecting the peer ports. Modifying a selected port via the Port Mgr tab and selecting the 'Set Bypass' checkbox enables the Bypass configuration functions on the right side of the pane. The port pair can then be configured to operate in bypass mode immediately, on power-up or power-down/loss of power. A Bypass Disconnect mode can also be selected.
NOTE: Although a running WanLink can be configured to override this behavior, affected ports will revert to their default Bypass settings in the Port Mgr tab when the WanLink is no longer running. The hardware can be set for WanLinks to 'fail open,' for example.- Bypass NOW! Selecting this checkbox on the 'master' port of a Bypass Pair immediately enables Bypass Mode on this port and its 'slave' peer. A port pair in bypass mode acts like a single physical cable.
- Bypass Power-UP Selecting this checkbox on the 'master' port of a Bypass Pair enables Bypass Mode on power up.
- Bypass Power-DOWN Selecting this checkbox on the 'master' port of a Bypass Pair enables Bypass Mode on power down or loss of power.
- Bypass Disconnect Selecting this checkbox on the 'master' port of a Bypass Pair physically disconnects the cables using special electronics, effectively unpluging the cable as far as the peer machine is concerned.
- Watchdog This drop-down entry field allows you to set the Watchdog Timer (WDT) for the selected port. If the WDT for this port is not reset in the selected time interval, the port will be set to Bypass Mode.
- CPU Mask This drop-down entry field allows you to pin the interrupts for this interface to a particular subset of CPUs. For general purpose LANforge use, this will probably decrease performance, but for certain scenarios it can significantly increase performance. One positive scenario is high-speed (multi gigabit) LANforge-ICE on a multi-core system. You can pin the interface IRQs and configure the WanLinks for a particular CPU to make optimal use of CPU resources, bus, memory and cache access. If you are unsure of what value to set here, leave it at the default of 'NO-SET' to ensure the default values will not be modified, or contact support for more information.
Please note that most Linux distributions come with 'irqbalance' enabled by default. It may conflict with LANforge IRQ pinning unless specially configured to stay out of the way, so you may want to disable irqbalance with a command similar to:
/etc/init.d/irqbalance stop; chkconfig irqbalance off - WiFi Bridge This drop-down entry field allows you to configure WiFi Bridges. A WiFi bridge is used to transparently tie an external MAC address to a specific WiFi Station interface in LANforge. Starting in release 5.2.2, an IP address can be configured on the WiFi Station interface to bridge by IP instead of MAC address. See 'Bridge-IP' below. This can be used to make a LANforge WiFi emulator support third-party traffic generators.
To create a WiFi Bridge, set exactly one non-STA interface to a wifi bridge ID and set at least one STA interface to that same bridge ID.
The algorithm will look at packets arriving on the non-STA interface and attempt to match the source MAC to the MAC of an STA. If it finds the STA, the packet will be bridged onto that STA and transmitted out the wireless interface. Packets arriving on the STA interfaces will be bridged onto the non-STA interface. If the destination MAC is broadcast, it will be re-written to be the MAC of the STA.
The MAC of the STA must therefor exactly match the MAC of the external device being bridged. To bridge more than one external device, additional WiFi station interfaces should be created, using the MACs of the external devices. It is currently possible to change the MAC of an already-created station interface, but there may be subtle bugs with this. As a work-around, set all the MACs properly and then reboot the LANforge system. The interfaces should be re-created with the proper MACs and function normally.
Interfaces in a WiFi bridge should not have any IP addresses configured, and should not be running any other LANforge traffic such as WanLinks, Armageddon, Layer-3, etc.
Creating & Deleting Virtual Interfaces (VLAN, WiFi, Redirect, and Bridge)LANforge has the ability to create and delete virtual interfaces on the fly. Six types of virtual interfaces are currently supported. You must have a (virtual) port-license for each VLAN that you create: Please contact
This email address is being protected from spambots. You need JavaScript enabled to view it. if you need more licenses. LANforge has no hard upper limit on the number of interfaces that can be created. Candela has tested up to 2000 MAC-VLANs on a high-end machine, with each virtual interface running Layer-4 HTTP requests. Support for these virtual interfaces requires the LANforge resource to be running on Linux, with the Candela kernel and updated iputils package. See the Installation Guides for more details if you are installing LANforge on your own machines.- MAC-VLAN
MAC-VLAN virtual interfaces create the illusion of multiple real interfaces on a single interface. From the outside world, it appears as if the physical LANforge interface is an ethernet switch with multiple machines connected to it. In other words, the MAC-VLANs are completely transparent to the other machines on the network. MAC-VLAN interfaces can be created on physical ethernet interfaces, redirect, and 802.1Q VLAN interfaces.
- 802.1Q-VLAN
LANforge also supports creation and deletion of 802.1Q VLANs. Unlike MAC-VLANs, 802.1Q VLANs speak a slightly different protocol on the ethernet network. This means that the systems that the LANforge machine is talking to must also be configured for 802.1Q VLANs. 802.1Q VLAN interfaces can only be created on physical ethernet and redirect interfaces.
- Redirect-Devices
Redirect-devices are a pair of virtual interfaces that are logically connected with a loopback cable on the far side. Redirect-devices are not directly associated with any physical interface. If rdd0 and rdd1 are a pair, then when you transmit a packet on rdd1, the packet will be automatically received on rdd0. This feature is used for configuring LANforge-ICE in router mode, and can also be used for demonstration purposes where physical interfaces are in short supply.
- Bridge-Devices
Bridge devices are Linux network devices that allow one to aggregate other network interfaces into a single broadcast domain. After creating a bridge device, it can be modified to include the network devices that are to be associated with the bridge. Logically, bridges are very similar to an ethernet switch. Bridge-devices can be configured for Spanning Tree Protocol to better emulate and interact with real world networks.
- WiFi Virtual Station
WiFi Virtual Station (Virtual STA) interfaces create the illusion of multiple distinct WiFi stations (think: laptops with WiFi NICs) using a single physical WiFi radio. To the Access Point(s) (APs) it appears as if each Virtual STA is an individual station. Each Virtual STA has its own MAC, IP address and routing table. All LANforge-FIRE related traffic generation features work with Virtual STAs. Virtual STAs may only be created on Radio Devices.
NOTE: The only supported Radio Devices are Atheros NICs using special drivers provided by pre-built Candela kernels and appliances. - Virtual WiFi Access Point
The Virtual WiFi Access Point (WiFi VAP) requires a custom LANforge madwifi driver and hardware. WiFi VAP interfaces may only be created on Radio Devices.
NOTE: The only supported Radio Devices are Atheros NICs using special drivers provided by pre-built Candela kernels and appliances.
NOTE: Some Radio devices may have improper (or overly conservative) regulatory domain settings. LANforge supports over-riding the regulatory domain, but if done improperly, this can put the system out of regulatory (FCC, in the USA) compliance. Please contact support if you want information on how to change the regulatory domain.
Select a VLAN type at the top of the window. When creating a MAC-VLAN, you must specify a MAC Address to uniquely identify this VLAN. When creating 802.1Q VLANs you must specify the VLAN-ID. For redirect-devices, just specify the two redirect names. We suggest rdd0, rdd1, etc, but you can also name them as regular ethernet devices if you wish (eth2, eth3, etc).
Multiple VLAN interfaces can be created at once by entering a Quantity greater than 1. Enter the beginning IP and/or MAC address and the create function will automatically increment the MAC and/or IP addresses. Selecting the DHCP-IPv4 checkbox will set all interfaces as DHCP-IPv4 clients to receive their IP address via DHCP. The remainder of the interface attributes can be modified following creation via the Modify button on the Ports tab. Newly created VLAN interfaces will be visible on the Netsmith display after clicking the Sync button.
Select the Use WPA checkbox to enable WPA and related wpa_supplicant authentication methods.
To delete a virtual interface, select it on the Port Mgr tab and click the Delete button.
Sniffing PortsIf you have Wireshark installed and configured correctly on your LANforge machines, and if your machine upon which you are running the GUI supports the X-windows protocol, you may sniff a particular port. To sniff a port, select it and click the Sniff Packets button. You may have to change the DISPLAY option box under the Sniff Packets button if you have a non-standard setup. For example, if your LF GUI is running on one PC and your LF Server is on another, you would type in the IP address of the LF GUI machine with :0.0 at the end so that the LF Server would be allowed to display the Wireshark program on the LF GUI PC. For Windows PCs running the LF GUI, the cygwin program must be installed per the GUI installation instructions. When Wireshark pops up, you can start sniffing packets by clicking on the 'Capture' menu item.
- Set IP Info is selected by default and provides for modification to the DHCP-IPv4 checkbox and other IP address information.
-
Event Log
The Event Log tab is used to record interesting events. The user may also create custom events. This may help users coorelate test results with certain events, such as link up/down, starting and stopping of tests, etc. Suggestions are welcome for more events of interest.
The text message in the events can be modified by the user. Double-click the event, or use the right-click popup-menu to bring up the Create/Modify widget.
The can also be logged to a file and the default priorities can be over-ridden. Each event type can also be filtered out if the user is not interested in it. To modify these settings, click the Configure Events button, and modify the values in the resulting window:
-
Command Output
The Messages tab is used to convey miscellaneous information from the LANforge server to the user. It can also be used to input CLI commands to the LANforge server. You can see an example of its output here:
The Save and Clear Text buttons only affect the LANforge Manager machine performing the actions and do not affect other machines which may be logged in to the LANforge server. Clicking the Save button will pop up a Save window so the contents of the text panel can be saved to the Manager machine. Clicking the Clear Text button will clear the message contents and replace them with a Day/Date/Time log entry.
-
Automatic Table Calculations
With the release of 5.1.5, most tables in the LANforge-GUI now support automatic calculations of their numeric columns and user-selected rows. Select the rows you are interested in and use the right-click->Calculations menu item to bring up the calculations window.
The top section has three rows: Sum, Mean (Average), and Median. The Mean is the sum of all selected rows divided by the number of rows. The Median is the value in the middle of a sorted list of the column data.
The bottom section lists the deviations from the average for each selected row and the standard deviation for the entire column of data.
The deviation table rows may be sorted by clicking on a column header, and the data can be refreshed for the previously selected rows by clicking Refresh. It will not be automatically updated after the initial creation.
-
Pull-Down Options
The four pull-down menus located at the upper left of the LANforge Manager window provide additional features and configuration options.
Control- Connect: Brings up the LANforge Connection Management window to Connect, Disconnect and Discover LANforge systems. Also brings up the LANforge-GUI Preferences window (see description below).
- Disconnect: Brings up the Logout window to disconnect from the LANforge server. Also brings up the LANforge-GUI Preferences window (see description below).
- Client Admin or Login: Allows you to log in as a particular user. See Client Login for more information.
- Debug: If you are having difficulty with the software, Candela Support personnel may ask you to turn on the logging, and you can do that through this menu item. For normal use, Debug may not be very useful.
- Preferences: The LANforge-GUI Preferences window will pop up the first time the GUI is launched and each time the Connect or Disconnect pull-down options are selected. If no changes in preferences are desired, click OK to close the window. LANforge-GUI Preferences are divided into two tabs and provide for selecting or deselecting certain functionality and the tabs to be displayed in the LANforge Manager window. Except for the 'Simple ICE' selection, changes to preferences in LANforge Manager Tabs will not take effect until the GUI is restarted. Clicking OK after changing preferences saves the selections and closes the window. Clicking Reset Config restores LANforge-GUI preferences to their default configuration. This will cause the GUI to exit and when restarted, it will be in the default configuration.
- Poll Mgr: Select this mode for larger configurations with 400+ cross-connects.
- Auto-Submit: Allows for changes in fields which have a 'GO' button to be submitted automatically. If not selected, the 'Go' button must be clicked to submit the change.
- Confirm Exit: Select this to require user confirmation prior to exiting the GUI.
- Confirm Netsmith Sync: Select this to require user confirmation prior to syncronizing Netsmith (changes not applied will be lost).
- Anti-Alias lines in Netsmith: Select this to allow anti-aliasing (sub-pixel smoothing) when rendering Netsmith display objects.
- Show Commas: Select this to display most numbers with commas.
- Display Graph Duration: Enter the time scale for graphs (default is 1.0 minute).
- Skip delete warning in Netsmith: Select this to delete objects in Netsmith without a confirmation.
- Set Extended Title: Text added here will be appended to the given title on the LANforge Manager widget.
- Skip delete warning in Reporting Manager: Select this to delete reports in the Reporting Manager without a confirmation.
- Show Tooltips: Select this to display tooltip information with the specified duration and delay (miliseconds).
- Simple ICE: Select this to limit the LANforge display to a simplified LANforge-ICE WAN emulation feature set.
- Collision-Domains: Select this to display the ICE (WanLink) Collision Domains tab.
- File-IO: Select this to display File related screens.
- LANforge-ICE: Select this to display LANforge-ICE related tabs.
- Layer-4: Select this to display Layer-4 related screens.
- Generic: Select this to display Generic Endpoint related screens.
- LANforge-FIRE: Select this to display LANforge-FIRE related tabs.
- Armageddon: Select this to display Armageddon related screens.
- Test Manager: Select this to display the Test Manager tab.
- Serial Spans: Select this to display Serial Span related screens.
- PPP-Links: Select this to display PPP related screens.
- Install License: Allows new license keys to be installed on the LANforge server. Current license file contents are listed on the top panel of the Install LANforge Licenses window. Copy the new license information into the bottom panel labeled 'New License Keys' and click OK. The new license file will be in use once the LANforge Manager is restarted.
NOTE: Even if multiple resources are configured in your system, the license information only needs to be installed on the master resource.
- Shutdown Machine: This command will shutdown the machine designated as the LANforge Manager.
NOTE: Shutting down a machine will destroy any test that is using that machine and reboot the operating system. The Operating system may not come back up until you power-cycle the machine. You should shutdown the machine at lease one minute before shutting off the power!
- Exit: An alternate way to shut down the LANforge-GUI. A confirmation window will pop up when you select either 'Exit' from the Control pull-down menu or attempt to close the LANforge Manager window. Click the Exit LANforge GUI button to confirm the shutdown. Note that exiting the LANforge-GUI does not affect LANforge server processes.
Deselecting the 'Confirm when exit is requested?' checkbox will allow the LANforge Manager to shutdown immediately without displaying the confirmation window.
Reporting- Print (Fit to Page): Allows you to print the data on a selected tab as viewed in the GUI to a printer or PDF document which will be automatically sized to fit on one page. LANforge does not support printing information displayed on the Status or Messages tabs.
- Print (Multi Page): Allows you to print the data as viewed in the GUI to a printer or PDF document, splitting the columns up across several pages.
- Dynamic Reporting: Allows real-time graphing of multiple data sets from multiple Endpoints and Ports, as well as global stats. Multiple graph windows may be used concurrently.
The main graph has two independent axes, with Axis B controls on the left and Axis A on the right. By default, data-sets other than Latencies are assigned to Axis A and Latencies are assigned to Axis B. The user can drag data sets from one axis to another by dragging the label at the bottom of the graph to the desired side.
A small button above each of the Axis labels selects that axis for actions that can work on either axis (mouse controlled zooming and clicking).
The vertical drag bars scroll the data associated with that axis up or down. If the mouse is released within the outer 10% of the drag bar, it is automatically re-centered to allow more adjustment.
Zooming is handled via several methos:
- The + button zooms in.
- The - button zooms out.
- The 0 button returns to defaults.
- The user can drag a box around an area that will become the new vertical bounds for the graph (the horizontal zoom will not be changed by this action).
- A wheel mouse can also be used to zoom in and out.
- Double-clicking on a point centers on that point and zooms in.
The horizontal time axis can be controlled by the range-slider at the bottom of the widget. Currently, only the last 10 minutes of data is viewable, but you can zoom in within that 10 minutes.
The Position Label at the bottom of the report screen enables/disables the cross-hairs and numeric coordinates printout that follows the mouse cursor.
The Pause checkbox will freeze the data sets where they are, allowing detailed analysis.
The Print button will print the entire graph with standard printing tools.
To add data-sets, click on the Add/Remove button for Endpoints or Ports and after selecting the appropriate entities, select some data-type options from the Graph Data panel. You may also select the Global Stats checkbox to graph global data.
- Reporting Manager: Allows you to save data on reporting elements such as Endpoints, Interfaces (Ports) and Resources to .CSV formatted files that can be later turned into graphical HTML reports. The Reporting Manager allows you to control where and when Endpoint CSV data is stored. All report data can be saved on the GUI host PC. Endpoint, Port and Resource reports can also be saved on the LANforge Manager Server machine by selecting one or more checkboxes in the Configure Manager Server Reporting panel. Data will be saved in the directory listed in the Report Dir field. This directory is created in the same location where LANforge is installed (typically /home/lanforge/) unless another path is specified. Clicking the Refresh Configuration button updates the current report settings of the LANforge Manager Server. The Start Saving and Stop Saving buttons control the saving of reporting data. Clicking the Start Saving button begins saving reporting data to .CSV files in the selected directory. Reporting data will continue to accumulate until the Stop Saving button is clicked. Every Start Saving and Stop Saving cycle creates a new set of CSV files in addition to any exisiting CSV files. Graphical HTML reports of selected Endpoints can be created by clicking the Generate Report button any time.
NOTE: Manager Server and GUI Reporting are supported if using the LANforge LiveCD but all files must be saved to external storage media.
Report Data Directory Displays the file path to the currently selected directory. Click the Choose Directory button to select or create a different directory for saving .csv data reports. Report Data Frequency Select the rate at which Endpoint data will be saved. The value (in seconds) is how often a snapshot of Endpoint data should be taken. Selecting a higher value will reduce disk space usage and lower the stress on the GUI host PC. 'Best Precision' saves data at the rate of each individual reporting element's report timer. It uses the most disk space and the highest processing power of the GUI host PC. Reporting Status Displays the current reporting status (whether reporting data is currently being saved or not). Click the Generate Report button to pop up the Report Generator window which enable you to create a customized graphical HTML report. First, choose the directory where the .csv report data was saved. This should be the same location as in the previous step. Next, choose a main directory where the GUI will save the HTML reports. This directory will be the top-level directory under which all Report Name directories will be stored. Alternatively, the individual .csv files can be viewed directly by navigating to the Report Data Directory mentioned above and opening the files with a spreadsheet application.
Report Name
Type the directory name for the current HTML report to be stored or accept the default name which includes a UNIX time stamp.Sample Interval
The interval over which cumulative samples will be gathered. For instance, to average 30 seconds worth of reports into a single graph data point, use 30. If the graph is too narrow to hold this many data points, the sample interval will be automatically set to the closest valid value. The actual interval used will be shown in the detailed view of the graph in the generated report.Width
Specify the width (in pixels) of the graphs to be generated.Height
Specify the height (in pixels) of the graphs to be generated. Start Time Offset Specify the number of seconds of data to skip before starting the report. Duration Specify the number of seconds of data to report. Zero means graph all.After choosing your HTML report options select the Endpoints, Interfaces, and Resources that should be included in the HTML report. When you have the data files you want selected, click the Generate Report button.
The Report Generation Progress pop-up will present the entire status of report generation for each Endpoint, Interface, or Resource selected. The duration of report generation will depend on the size and number of .csv data files selected. At the conclusion of the report generation, the progress pop-up will confirm the name and directory of the completed HTML report. Your web browser will then be launched automatically to the index of the newly generated HTML report.
To view the completed HTML report, navigate to the directory printed in the progress pop-up and open the index.html file in your web browser application.
Tear-OffUp to this point, each tab has been shown as it appears among the collection of other tabs embedded in the main window. Selecting a tab from the 'Tear-Off' pulldown menu will display the selected tab in a new window. This will allow you to monitor several tabs at once! Click the 'Close Window' [X] button in the upper right corner of the window to return the tab to the main window. Below is an example of the Layer-3 tab tearoff:
HelpThe Help Menu provides information about Candela Technologies, Inc., as well as other useful information.
- About Candela Technologies: Provides a brief statement about the Candela Technologies, Inc.
- Current Pane: Links to the LANforge-GUI Users Guide online.
- Overview: Links to the LANforge Network Tester Overview guide online.
- Version: Displays build information for the version of LANforge that is currently installed.
- License Info: Displays the current LANforge license allowances and lists the LANforge licenses currently in use.